Peanut Butter Ice Cream
This vegan peanut butter ice cream is creamy, dreamy, and easy to make without an ice cream maker… or dairy! I’ll show you how to make the no-churn ice cream base from scratch with only 3 ingredients. Add salty roasted peanuts and chocolate chips or your favourite mix-ins to make this recipe your own.

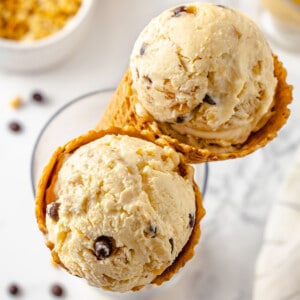
Peanut butter ice cream is the ultimate indulgence for peanut butter lovers! This vegan no-churn ice cream starts with a rich peanut butter base, which I filled with salty roasted peanuts and chocolate chips to make this peanut butter dessert THAT much more decadent.
If you’ve never had no-churn ice cream before, you’re in for a treat. Recipes like my strawberry ice cream and this one work by folding whipped cream (or, in this case, coconut cream) with sweetened condensed coconut milk and creamy peanut butter. The light, fluffy whipped cream incorporates air into the ice cream without churning, yielding a soft, scoopable result.
It’s pretty magical, friends, and I can’t wait for you to taste this peanut butter ice cream for yourself.
Peanut Butter Ice Cream Recipe Highlights
- No dairy. While most no-churn ice creams are made with dairy condensed milk and whipped cream, I use coconut-based versions of these ingredients. This is an ice cream everyone can enjoy!
- No-churn. Which means no ice cream maker! All you need is an electric mixer, two mixing bowls, and a loaf pan or container to store your peanut butter ice cream.
- Crowd-pleasing flavour. Peanut butter and chocolate are hard to resist. You’ll find the same combo in my vegan chocolate peanut butter brownies and no-bake peanut butter pie.

Notes on Ingredients
Scroll down to the recipe card to find the ingredient quantities and recipe instructions.
- Coconut whipping cream – I used Nature’s Charm coconut whipping cream.
- Sweetened condensed coconut milk – I also used the Nature’s Charm brand for this.
- Creamy peanut butter – Or substitute sunflower seed butter if you have a peanut allergy.
- Chocolate chips – Be sure to use a vegan brand.
- Roasted peanuts – Chop these to your desired size.
What If I Can’t Find Non-Dairy Sweetened Condensed Milk?
If you can’t find sweetened condensed coconut milk locally, you can order it online from a specialty store or Amazon. Another option is to make my measure-for-measure vegan sweetened condensed milk substitute.

How to Make Vegan Peanut Butter Ice Cream
As much as I love my classic vegan ice cream, sometimes it’s nice to leave the ice cream maker in the cupboard! Here’s what you’ll need to do to make this no-churn chocolate peanut butter ice cream from scratch.
- Prep your tools. Chill the coconut whipping cream in the refrigerator overnight. Chill the mixing bowl and beaters in the freezer for at least 20 minutes before whipping the cream.


- Make the whipped cream. Place the coconut whipping cream in a mixing bowl. Use a hand mixer to beat it until it’s thick and creamy.
- Finish the ice cream mixture. Beat in the peanut butter and sweetened condensed coconut milk until the mixture is smooth.


- Add the mix-ins. Fold in the chocolate chips and chopped peanuts.
- Freeze. Pour the mixture into a freezer-safe container or loaf pan and top with additional chocolate chips and peanuts. Freeze for at least 4 to 6 hours.
Serving and Storing No-Churn Ice Cream
Once your homemade ice cream is in the loaf pan, press a sheet of plastic wrap directly against the surface before covering it with a lid. This helps to prevent ice crystals from forming while it’s in the freezer. See below for more storage instructions.
Before serving, let this peanut butter ice cream sit at room temperature for 10 to 15 minutes to soften, then scoop it into bowls or cones. It’s also fantastic with chocolate desserts like vegan chocolate cake and chocolate sheet cake. I love it topped with my easy vegan caramel sauce and crushed pretzels, too!

Tips for the Best Peanut Butter Ice Cream
- Don’t forget to chill the cream. In order for the coconut whipping cream to hold its shape when beaten, you’ll need to chill it in the refrigerator. This recipe won’t work without this step!
- Use standard creamy peanut butter. I love homemade peanut butter and store-bought natural peanut butter, but because the oil can separate, it’s best to use shelf-stable, creamy peanut butter for this recipe, the kind that doesn’t need to be stirred before using.
- Let it soften before serving. Don’t forget to let the ice cream soften at room temperature for 10 to 15 minutes before scooping. This will ensure that it’s easy to scoop and has the perfect texture.
Variations
This homemade peanut butter ice cream was made for mix-ins!
- Peanut butter cup ice cream. Fold in chopped vegan peanut butter cups instead of chocolate chips.
- Peanut butter and jelly ice cream. Swirl in ribbons of strawberry jam.
- Brownie chunk. Add chopped vegan brownie pieces.
- More add-ins. Try toasted coconut flakes, mini vegan marshmallows (or marshmallow fluff), and anything else that strikes your fancy.

How Long Does Homemade Ice Cream Last in the Freezer?
Properly stored, this homemade peanut butter ice cream can be kept in the freezer for up to 2 weeks. If you store it in a loaf pan, be sure to wrap it tightly.

More Recipes for Peanut Butter Lovers
- Peanut Butter Cake
- Peanut Butter Banana Overnight Oats
- Thai Peanut Sauce
- Fresh Spring Rolls with Peanut Ginger Sauce
- Peanut Butter and Strawberry Jelly Compote Waffles
Enjoy friends! If you make this peanut butter ice cream, please snap a photo and tag #jessicainthekitchen on Instagram. We’d also love it if you would leave a comment below and give the recipe a rating. Thanks so much!
Peanut Butter Ice Cream
Ingredients
- 1 can coconut whipping cream, chilled in the fridge overnight (15 oz or 400 grams) (I used Nature’s Charm coconut whipping cream)
- 1 can sweetened condensed coconut milk, 11.25 oz or 320 grams (I used Nature’s Charm)
- 1 cup creamy peanut butter, 245 grams
- ¼ cup chocolate chips, 40 grams
- ¼ cup chopped peanuts, roasted and salted (42 grams)
Instructions
- Place a can of coconut whipping cream in the refrigerator overnight. It’s also recommended to chill your mixer bowl and whisks in the fridge for 20 minutes prior to using them.
- Once chilled, remove the coconut whipping cream from the can and transfer it to a mixing bowl. Beat the cream using a mixer until it becomes thick and creamy.
- Add the peanut butter and sweetened condensed coconut milk to the whipped cream. Continue mixing until the mixture is creamy and smooth.
- Fold in the chocolate chips and chopped peanuts, making sure they are evenly distributed throughout the ice cream mixture.
- Pour the mixture into a freezer-safe container or loaf pan. Top with more chocolate chips and chopped peanuts.
- Place the container in the freezer and let the ice cream set for at least 4-6 hours or until it becomes firm.
- When you’re ready to serve the ice cream, take it out of the freezer and let it stand at room temperature for 10-15 minutes to soften slightly. Scoop the ice cream into bowls or cones, and enjoy!
Notes
Disclaimer: Although jessicainthekitchen.com attempts to provide accurate nutritional information, kindly note that these are only estimates. Nutritional information may be affected based on the product type, the brand that was purchased, and in other unforeseeable ways. Jessicainthekitchen.com will not be held liable for any loss or damage resulting for your reliance on nutritional information. If you need to follow a specific caloric regimen, please consult your doctor first.


A bit of work but well worth it. No peanuts or chocolate chips in mine, went with chopped “Justin’s” Dark Chocolate PB Cups, which are Vegan. My wife, as usual, was skeptical (she’s just Vegetarian but mostly eats and cooks Vegan), and has her own ice cream but in the AM a substantial amount had disappeared. Cohabitation can be difficult.
Thanks so much for sharing Bloodthirsty Vegan! You are hilarious re substantial amount gone and cohabitation hahaha I feel you! Safe to say your wife also enjoyed this recipe! 🙂
What if I want to use my ice cream maker? Should I add a bit of vodka to the mixture?
Hi Gloria,
You can just add it to it! Hope this helps!
Hello Jessica. My name is Charlene and it is so nice to meet you. I started trying to go Vegan about a year ago and I kept messing up and going back and forth. After my divorce in July I started again on August 14th of this year and I am on Day 23 now. I absolutely love it. I am more serious about my health and wellness now than ever before. Living in the South its hard because everyone wants fried chicken, macaroni and cheese, and other meats that I do not like. In my little small country town my choices are limited but I press on harder now and I love to cook my own foods because I know what is going in the food. I have not tried a recipe yet but I am going to try that Peanut Butter Ice Cream. I will let you know how it turns out.
Hi Charlene,
It’s lovely to meet you too! I’m so glad to hear about your journey towards a vegan lifestyle and your commitment to it. Going vegan can be a challenging but rewarding experience, especially when faced with the tempting Southern cuisine you mentioned. Your determination is admirable!
Cooking your own food is a fantastic way to have full control over your meals and ensure they align with your vegan values. I hope you enjoy my Peanut Butter Ice Cream so much; I’m sure it’ll turn out great! Feel free to share your experience and any other vegan recipes you try; I’d love to hear about them.
If you have any questions or need support along your vegan journey, please don’t hesitate to ask. And once again, congratulations on reaching Day 23 and prioritizing your health and wellness. Keep up the fantastic work! 😊🌱
Hello! I hope all is well! Can you use and manual whisk or electrical whisk or do you have to use an electrical hand mixer with the double beater attachment?
Hi Leeya,
You can use either but you will be whisking with the manual whisk for some time just a heads up! You can also use an electrical whisk!
Can not get sweetened condensed coconut milk.
Would coconut milk work?
Hi Jo,
You’ll definitely need a sweetened condensed coconut milk for this recipe to work but not to worry—take a peek at my recipe here. This will show you how to make it perfectly so that you can include it in this dish if its not available to you in-store! Happy ice cream-making!