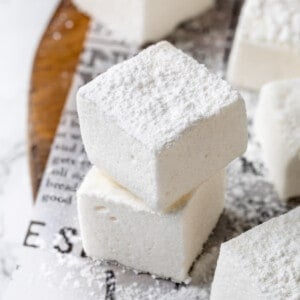
Vegan Marshmallows
Light, airy, fluffy vegan marshmallows are perfect for adding to hot cocoa, toasting over a campfire, and using in all your favourite recipes! Here’s how to make them.

When you first go vegan, you know you’re giving up dairy, meat, and eggs. But then you start to realize all of the other foods that have sneaky animal ingredients in them. Wait—honey isn’t vegan?! I can’t eat gummy bears!
For me, one of those disappointments was marshmallows. I mean, what am I going to put in my hot chocolate?! How will I make Rice Krispie treats?
What Is the Difference Between Vegan Marshmallows and Regular?
Traditional marshmallows are made with gelatin, which is an animal product derived from bones. Vegan marshmallows are made without gelatin—but the exact ingredients they use to replace the gelatin vary from one brand or recipe to the next.
While there are a number of fabulous vegan marshmallows on the market today, homemade marshmallows are always a special treat—they’re lighter, fluffier, and just all-around incredible. I don’t make this recipe every single time I need marshmallows, but I do make it when I want something a little more impressive!

Why This Vegan Marshmallow Recipe Works
Here’s what makes these vegan marshmallows work without the addition of gelatin.
- Agar-agar. Agar-agar is a fantastic gelatin substitute that’s derived from seaweed. It is very powerful, so it’s important to weigh it out!
- Aquafaba. A heavy-hitter in vegan baking, aquafaba can be whipped into the consistency of beaten egg whites and used for vegan marshmallows, Sweet Potato Soufflé, and Vegan Tiramisu.
- Cream of tartar. This helps stabilize the beaten aquafaba so it maintains its light, fluffy texture, rather than deflating.

Notes on Ingredients
Scroll down to the recipe card to find the ingredient quantities and recipe instructions.
- Powdered sugar – A combination of powdered sugar and cornstarch keeps your vegan marshmallows from sticking.
- Cornstarch
- Aquafaba – Chill this before starting the recipe. If you don’t get to chill it, increase your prep times by a few minutes (I note them below in the recipe).
- Cream of tartar – You can usually find this with the herbs and spices at the grocery store.
- Vanilla extract – The flavour most of us associate with marshmallow is actually vanilla!
For the Syrup:
- Granulated sugar
- Water – Use purified or filtered water, not tap water, which can have off flavours.
For the Agar Mixture:
- Agar-agar powder – You can find this at specialty grocers and health food stores; it can also be purchased online. If you can only find agar-agar flakes you can also use this, but it does not measure out to the same amount in teaspoons, so be sure to measure it out.
- Granulated sugar
- Water
What Is Aquafaba?
Aquafaba is a liquid from cooked chickpeas—either chickpeas cooked from dry beans or the liquid poured off of a can. It’s often used in vegan cooking and baking as an inexpensive egg replacer.
How to Make Vegan Marshmallows
Making vegan marshmallows does take a little bit of effort, but trust me: it’s so worth it!


Prepare. Line a 9-inch pan with parchment paper and lightly dust it with powdered sugar and cornstarch. You’ll want to do this first since you want to transfer your marshmallows immediately after you’re finished mixing, else it’ll begin to firm up in your mixing bowl and won’t be that smooth delicate pour.
Whip the aquafaba. Whisk the aquafaba and cream of tartar in the bowl of a stand mixer fitted with the whisk attachment until soft peaks form. (This should take about 10 minutes on medium speed or medium-high speed if you’re not using chilled aquafaba.)
Make the syrup. Combine the sugar and water in a saucepan set over medium-high heat. Bring the mixture to a simmer without stirring and continue to cook until the syrup reaches 240°F.
Add the syrup to the aquafaba. Immediately take the syrup off the heat. Slowly drizzle the syrup into the bowl with the aquafaba while whisking with the mixer. Continue to whisk for about 5 minutes, or until the mixture becomes glossy and stiff peaks form. Add the vanilla.


Make the vegan gelatin mixture. Whisk together the granulated sugar, water, and agar-agar powder in a saucepan set over medium-high heat. Bring to a boil, then whisk continuously for 2 to 3 minutes.
Finish the marshmallow mixture. Turn the mixer back on and slowly pour the agar mixture into the aquafaba mixture. Continue to whisk until the agar is incorporated into the aquafaba mixture, which shouldn’t take more than 1 minute.
Cool. Pour the marshmallow mixture into the prepared pan and spread it evenly. Loosely cover the pan with a kitchen towel and cool for 4 to 6 hours, or until set.

Finish. Once finished setting, dust the tops of the marshmallows with powdered sugar and cornstarch, then cut the marshmallows. If you plan on storing them, you can also roll the sides of the marshmallows in the powdered sugar mixture to prevent sticking.
Tips for Success
These tips will help you make perfect vegan marshmallows!
- Have all your ingredients out and measured before beginning, mise en place style. When making marshmallows, you really want to do each step immediately after the other, not allow things to cool or get cold, which can throw off the final result. Having everything out will help so much with that.
- Don’t over-beat the aquafaba. Overbeating will cause the marshmallow mixture to become too stiff and harden when it sets.
- Be careful when adding the agar mixture into the aquafaba. Adding the agar too quickly can cause the marshmallows to become clumpy and dense. A slow steady or broken up drizzle works best.
- Use a thermometer. There’s no way around it—it’s the only way to know the temperature of your syrup! Check the temperature of your sugar syrup before adding it to the whipped aquafaba. If it’s higher than 240ºF, let it cool a bit before adding.

Variations
You can add all kinds of flavours to your vegan marshmallows! Here are some fun ideas:
- Make birthday cake marshmallows by adding sprinkles.
- Mix in mini chocolate chips for chocolate chip marshmallows.
- Swap the vanilla extract for different flavors. Peppermint extract is fantastic for the holidays!
How to Store
Store your vegan marshmallows in an airtight container in a cool, dry place for up to 2 weeks.
Can Vegan Marshmallows Be Frozen?
Vegan marshmallows can be frozen for up to 3 months in an airtight container or freezer bag. Let them thaw at room temperature before you use them.

More Vegan Basics
- How to Make Vegan Parmesan Cheese
- Vegan Ricotta
- Vegan Heavy Cream Substitute
- How to Make Vegetable Broth with Veggie Scraps
- The Best Vegan Cream Cheese
Enjoy friends! If you make this vegan marshmallow recipe, please snap a photo and tag #jessicainthekitchen on Instagram! We’d also love it if you would leave a comment below, and give the recipe a rating! Thanks so much!
Vegan Marshmallows
Ingredients
- ½ cup powdered sugar, for dusting the pan (2 oz/60 grams)
- ½ cup cornstarch, for dusting the pan (1.75 oz/50 grams)
- ½ cup aquafaba, 118 grams (it is better to use chilled aquafaba) I recommend no salt added aquafaba
- ¼ teaspoon cream of tartar, 1 gram
- 2 teaspoons vanilla extract, 8 grams
For syrup:
- 1 cup granulated sugar, 7 oz/200 grams
- ⅓ cup water, 80 grams
For agar mixture:
- 4 teaspoons agar-agar powder, 10 grams
- ¼ cup granulated sugar, 50 grams
- ¾ cup water, 180 grams
Instructions
- Prepare a 9-inch pan by lining it with parchment paper and lightly dusting it with a mixture of powdered sugar and cornstarch. This will prevent the marshmallow from sticking. You'll want to do this first since you want to transfer your marshmallows immediately after you're finished mixing, else it'll begin to firm up in your mixing bowl and won't be that smooth delicate pour.
- In the bowl of a stand mixer fitted with a whisk attachment, pour in the aquafaba and add the cream of tartar. Start whisking at medium speed until the aquafaba forms soft peaks. (This should take about 10 minutes on medium speed or medium-high speed if you're not using chilled aquafaba.)
- In a saucepan, combine 1 cup of granulated sugar and ⅓ cup of water. Place the saucepan over medium-high heat and let the mixture come to a simmer without stirring. Insert a candy thermometer into the syrup and continue simmering until it reaches 240°F (115°C). It should take approximately 10 minutes.
- Once the sugar syrup reaches the desired temperature, slowly drizzle it into the whipped aquafaba while continuing to whisk. Keep whisking for an additional 5-8 minutes until the aquafaba becomes glossy and stiff peaks form. Add the vanilla extract during this process.
- In a saucepan, combine ¼ cup of granulated sugar, ¾ cup of water, and the agar-agar powder. Mix the ingredients thoroughly. Place the saucepan over medium-high heat and bring it to a boil. Whisk continuously for 2-3 minutes while the mixture simmers.
- Slowly pour the agar mixture into the whipped aquafaba, whisking constantly until the mixture is fully incorporated. Continue to whisk until the agar is incorporated into the aquafaba mixture, which shouldn't take more than 1 minute.
- Using a spatula, transfer the marshmallow mixture to the prepared pan, spreading it evenly. You won't get everything out, closer to about 90% out, and don't try to get it all out because it'll start to set as it hits the pan and you want to focus on smoothing that part down. If you're having difficulty spreading the marshmallow fluff into an even texture, slightly wet your hands of the spatula to help you pat it down. Loosely cover the pan with a towel, allowing the marshmallow to set at room temperature for 4-6 hours.
- Once the marshmallow has set, dust the top with the remaining powdered sugar and cornstarch mixture, ensuring a light coating. Loosen up the edges with a dinner knife, then dust a sharp knife with your cornstarch powdered sugar mixture.
- Cut out 36 square marshmallows (6 rows, 6 columns) or carefully cut the marshmallow into desired shapes. If desired, roll the cut marshmallows in the sugar-cornstarch mixture, ensuring all sides are coated. Gently tap off any excess mixture. Enjoy!
Notes
- Have all your ingredients out and measured before beginning, mise en place style. When making marshmallows, you really want to do each step immediately after the other, not allow things to cool or get cold, which can throw off the final result. Having everything out will help so much with that.
- Don’t over-beat the aquafaba. Overbeating will cause the marshmallow mixture to become too stiff and harden when it sets.
- Be careful when adding the agar mixture into the aquafaba. Adding the agar too quickly can cause the marshmallows to become clumpy and dense. A slow steady or broken up drizzle works best.
- Use a thermometer. There’s no way around it—it’s the only way to know the temperature of your syrup! Check the temperature of your sugar syrup before adding it to the whipped aquafaba. If it’s higher than 240ºF, let it cool a bit before adding.
Disclaimer: Although jessicainthekitchen.com attempts to provide accurate nutritional information, kindly note that these are only estimates. Nutritional information may be affected based on the product type, the brand that was purchased, and in other unforeseeable ways. Jessicainthekitchen.com will not be held liable for any loss or damage resulting for your reliance on nutritional information. If you need to follow a specific caloric regimen, please consult your doctor first.


Thanks for sharing the recipe and tips, first time making it and I’m so impressed it’s turned out really well. I’m going to use to make some chocolate covered marshmallow biscuits for boxing day. Hopefully will taste as fab as they look, I can think of so many things to do with them, thanks again.
Excited for you to give these a whirl, Pippa!
Thanks for the great recipe and tips, I’m going to use to make chocolate covered marshmallow biscuits for boxing day, the kids will love them. I’m really happy they turned out well especially on my first try, thanks again for sharing.
Yum! That sounds amazing, Pippa!
Hi! How do these melt for rice crispy treats?
Thanks!
Hi Tobi,
You can absolutely use these for rice crispy treats!! Enjoy!
Could I use coconut sugar and rice syrup? Thanks!
Hi Tobi,
We haven’t tried this with coconut sugar and rice syrup, or any other substitutes. You’ll want to be mindful that you’re using a powdered sub for a powdered ingredient here though, as texture will be so important. You’ll need a powdered sugar for dusting the pan. This recipe really works best as it is, but you’re definitely welcome to try with coconut sugar. Do let us know how it goes!
Thank you for sharing the recipes. I learned so many things on what ingredients and how to make them. Very helpful specially that I am a vegan.
Hi Crevi,
It’s our pleasure! We’re so happy you’re enjoying the recipes.
Thank you for sharing your recipe! We are going to try it tomorrow.
If we are making Rice Krispies, should we just combine with the butter and cereal at the point where it’s all whipped and ready to set in the pan?
Or do we need to let them set and then melt them with butter before mixing with cereal?
Hi Logan,
We have only tested it using them after they’re in marshmallow form so we couldn’t say how they’d perform before they set.
Love this recipe, thank you for sharing this great recipe!
We’ve been trying to find more vegan marshmallows at a cheaper price in NZ ($18 for 200g) and I’m so happy to find this recipe.
Tried it last night and they’ve turned out great, although the bottom became soggy incing sugar / cornflour mix and they are just soaking in the rest I put on, any ideas? Either way they are so good!! No complaints at all, just experience.
Hi Roxanne,
Thank you so much for sharing, and that sounds like a lot for vegan marshmallows, so I am so so happy you found success in this recipe! Once set, you could always put them on a rack instead, so they don’t sit in a pan bottom—does that sound like it would help?
If I’m going to add a flavour extract to make different flavoured marshmallows… Any suggestions on how much to add so it doesn’t alter the set or softness?
Hi Vicki,
You could swap out the 2 teaspoons of vanilla extract for another extract here if preferred! I’d suggest ticking to the listed amount so as to not throw the ratios off!