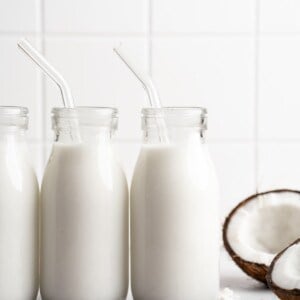
Coconut Milk
Instead of buying coconut milk, you can make it at home! This homemade coconut milk recipe is easy and delicious, and you only need two ingredients to make it. (Spoiler: One of them is water!)
")
Do you ever watch those influencers on TikTok who seem to make everything from scratch? Okay, I may have fallen down that rabbit hole personally (as evidenced by my posts on How to Make Sprinkles and How to Make Almond Milk), but there really is something so satisfying about making the kitchen staples you usually buy. And in that spirit, I’m sharing this creamy, incredibly tasty homemade coconut milk recipe! Yep, you can make coconut milk at home—and no, you don’t need to crack open a bunch of coconuts to do it. (Although I have made coconut milk from coconuts and it is so satisfying and delicious!)
Why It’s Worth It to Make Your Own Coconut Milk
Here’s why it’s time to put homemade coconut milk on your to-do list!
- As creamy as you like it. Full-fat coconut milk straight from the can is fab for recipes, but it’s not exactly something you’d sip on or pour in your cereal because it’s so rich. But lite coconut milk often has the opposite problem—it’s thin and watery. I love that with this homemade coconut milk, I can nail that perfect consistency for a coconut milk we use in practically everything!
- So simple to make. Seriously, you only need two ingredients to make this homemade coconut milk, and one of them is water! And the process itself is a breeze.
- No additives or preservatives. When you make your own coconut milk, you know exactly what’s going into it! Store-bought versions may contain additives or preservatives that can affect the taste and nutrition.
")
Notes on Ingredients
Here’s what you’ll need to make your own coconut milk. Scroll down to the recipe card to find the ingredient quantities and recipe instructions.
- Unsweetened coconut flakes – A lot of coconut flakes are sugary sweet, so it’s important to check the label and make sure the ones you’re buying are unsweetened.
- Water – This should be room temperature. Adjust the amount to get your desired consistency.
- Vanilla extract – Optional, if you plan on drinking your homemade coconut milk, using it for cereal, etc.
- Sweetener – Another optional add in! You can blend in a date, or add agave syrup.
How to Make Coconut Milk
The full instructions for this coconut milk recipe are at the bottom of the post, but here’s a visual overview so you can see what the process looks like.
")
")
- Blend. Combine the coconut and water in a blender and blend until the mixture is creamy and smooth. (If you want to sweeten the milk with a date, you can add this to the blender too.)
")
")
- Strain. Pour the coconut milk through a cheesecloth, nut milk bag, or fine mesh strainer.
- Flavour it. Add the vanilla or agave syrup if you’re using it.
- Use or store. You can use the coconut milk right away or pour it into a jar or other airtight container and refrigerate it for later.
Tips for Success
- Blend thoroughly. The more you blend, the creamier and smoother your homemade coconut milk will be. If you don’t have a high-speed blender, blend in intervals to prevent overheating.
- Adjust water to your liking. The amount of water used will affect the consistency of your coconut milk. Add more or less depending on how thick or thin you want it.
- Get creative with add-ins. You can customise your homemade coconut milk by using different sweeteners (try maple syrup or date syrup), extracts, and spices (I love adding cinnamon!).
")
What to Do With Leftover Coconut Pulp
You’ll have leftover coconut pulp after straining your coconut milk. Guess what? You can put it to use instead of throwing it away! Here’s what I do with it.
- Make coconut butter. Blend the pulp in a high-speed blender or food processor until it’s smooth. Learn more: How to Make Coconut Butter.
- Toast it. Spread the pulp on a baking sheet and toast it in the oven for a crunchy topping to add to Vegan Mango Ice Cream and Strawberry Lime Coconut Smoothie Bowls.
- Dry it for coconut flour. Spread the pulp in a thin layer on a baking sheet and bake at a low temperature (around 200°F/90°C) until it’s completely dry. Then, blend into a fine flour.
Using Your Homemade Coconut Milk
Homemade coconut milk is incredibly versatile and can be used in any recipe that calls for coconut milk or plant milk. I love using it to make smoothies (it’s especially delicious in this Mango Coconut Smoothie) and Pumpkin Spice Golden Milk. We also use it in cereal and add it to Instant Pot Steel-Cut Oats for breakfast.
How to Store
- Refrigerator: Homemade coconut milk should be stored in an airtight container, bottle, or jar. It can be refrigerated for 4-5 days. Make sure to shake well before each use.
- Freezer: You can also freeze your homemade coconut milk in an airtight container for up to 6 months. Just make sure to leave some room at the top of the container for expansion. Thaw in the refrigerator and shake well before using.
")
More Homemade Vegan Staples
Enjoy friends! If you make this homemade coconut milk, please snap a photo and tag #jessicainthekitchen on Instagram! We’d also love it if you would leave a comment below, and give the recipe a rating! Thanks so much!
Coconut Milk
Ingredients
- 2 cups unsweetened coconut flakes, 120 grams
- 3 cups room temperature water, 710 grams, (add up to 1 cup more for a thinner consistency)
Optional:
- 1 teaspoon vanilla extract, 4.2 grams
- 1 date, or 1–2 teaspoons agave syrup for sweetness
Instructions
- Add the coconut flakes and 3 cups of room temperature water to a high-speed blender. Blend on high for 2-3 minutes until the mixture is creamy and well-combined. If you’re not using a high-speed blender, you’ll need to blend longer – maybe up to 5 minutes, pausing in between. If you’d like thinner milk, add up to 1 cup more water and blend again briefly.
- Place a nut milk bag, cheesecloth, or fine-mesh strainer over a bowl or large measuring cup. Pour the blended mixture through the strainer to separate the coconut pulp from the milk. Squeeze or press out as much liquid as possible.
- If desired, add vanilla and a date or agave syrup to the strained milk. Blend briefly to incorporate. Adjust sweetness to taste.
- Transfer the coconut milk to an airtight container or jar.
Notes
Disclaimer: Although jessicainthekitchen.com attempts to provide accurate nutritional information, kindly note that these are only estimates. Nutritional information may be affected based on the product type, the brand that was purchased, and in other unforeseeable ways. Jessicainthekitchen.com will not be held liable for any loss or damage resulting for your reliance on nutritional information. If you need to follow a specific caloric regimen, please consult your doctor first.


