Red Velvet Brownies
With their signature red velvet flavour and fluffy, dairy-free cream cheese frosting on top, these vegan red velvet brownies are a divine treat for a special occasion, or anytime you’re craving a decadent but easy dessert!

Before I was a vegan food blogger, I was a baker. The very first dessert that I sold for my baking company was a red velvet cake, so it holds a special place in my heart. Sometimes, though, I want that red velvet flavour without making a whole cake (or cupcakes). For those times, these vegan red velvet brownies are perfect!
White vinegar isn’t a typical ingredient in vegan brownie recipes, but in these brownies, it’s key to that subtle, signature red velvet tang. I love finishing off my brownies with vegan cream cheese frosting, but if cream cheese frosting isn’t your thing, these red velvet brownies are just as delicious as is.
Why Everyone Loves These Vegan Red Velvet Brownies
- No more boxed mixes. You can make the best vegan red velvet brownies from scratch with pantry ingredients.
- Slightly fudgy and deliciously moist. I make these brownies with melted chocolate. They’re not too cakey and not too gooey. Just right!
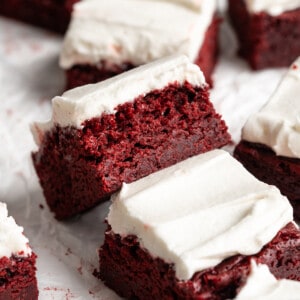
- Light, fluffy vegan cream cheese frosting. The rich, tangy cream cheese frosting makes the brownie taste like a slice of red velvet cake!

Notes on Ingredients
Here are the ingredients you’ll need for these vegan red velvet brownies. Please scroll to the recipe card for the exact recipe amounts.
- Chocolate chips – Make sure they’re vegan chocolate.
- All-purpose flour – To make gluten-free red velvet brownies, use your favourite measure-for-measure gluten-free flour.
- Flax eggs – Or 2 egg replacers. Here’s how to make a flax egg.
- Brown sugar – I use raw brown sugar, cane sugar, or coconut sugar.
- Oil – Vegan butter also works here.
- Vanilla extract or vanilla paste – Don’t use imitation vanilla extract! Vanilla is important to the overall flavour of these brownies.
- Natural red food colouring – Traditional red velvet recipes got their name from the reaction between the cocoa powder and vinegar (or buttermilk) in the batter, which tinted the cake slightly red. Since these brownies don’t contain cocoa powder, I recreate the red color with food coloring.
- Vinegar – Distilled white vinegar is best.
- Baking soda – Check the expiration date on the package, and if your leavening is old or expired, consider buying fresh so that your brownies rise properly.
Choosing Vegan Food Coloring
If you’re planning to make these brownies vegan, it’s important to use a natural food coloring that is also vegan-friendly. Some red food colorings contain carmine, an ingredient derived from insects. Instead, look for an ingredient list that contains plant-based alternatives like beet juice to give your red velvet brownies that iconic deep red hue.

How to Make Vegan Red Velvet Brownies
Here’s how to bake these fudgy dairy-free red velvet brownies, step by step.


- Prepare. Preheat your oven to 325°F. Grease or line an 8×8-inch baking pan.
- Melt the chocolate chips. You can melt them in a microwave-safe bowl or in a double boiler.
- Combine the dry ingredients. In a medium bowl, whisk together the flour and salt.


- Mix the wet ingredients. In a separate bowl, combine the flax eggs, sugar, and oil and beat with a mixer or by hand for about 2 minutes. Stir in the water, vanilla extract, and natural red food colouring.
- Combine wet and dry. Add the dry mixture to the wet mixture, along with the melted chocolate chips. Stir for about 3 minutes, or until combined.


- Add the vinegar and baking soda. In a small bowl, stir together the vinegar and the baking soda. Stir this into the brownie batter.


- Bake. Pour the batter into the prepared pan and tap the pan on the counter a few times to release any air bubbles. Bake for 35 minutes.
- Cool. Allow the brownies to cool completely in the pan on a wire rack. Then, let brownies chill in the fridge while you make the frosting.
Add the Frosting


- Start the frosting. Use a mixer to beat the butter and cream cheese together for about 2 minutes, or until fully incorporated. Beat in the vanilla extract and a pinch of salt.
- Add the sugar and cornstarch. Add a cup of sifted powdered sugar and all of the sifted cornstarch. Mix for about 1 minute, or until incorporated. Continue to add the powdered sugar a cup at a time until the frosting has reached the desired thickness.
- Chill. Cover the bowl and chill the frosting for at least 4 hours or overnight. You can enjoy it right away, but it will thicken up in the fridge.


- Frost the brownies. Spread the frosting onto the brownies, then refrigerate for at least an hour before slicing and serving.
Tips for the Best Vegan Brownies
- Adjust the texture as desired. For fudgier brownies, bake for 35 minutes. For slightly cakey brownies, bake for 40 minutes.
- Cool the brownies before frosting. Let the brownies cool completely in the pan before adding the frosting. Otherwise, the frosting will melt!
- Cut perfect slices. Slice the red velvet brownies with a warm knife, wiping it clean after each cut to prevent red velvet crumbs from getting all over the frosting.
- Use room-temperature ingredients. Let the vegan butter and cream cheese for the frosting come to room temperature. This will ensure a smooth and creamy consistency.
- Sift the cornstarch and powdered sugar. To prevent lumps in your frosting, sift the powdered sugar and cornstarch before using them.

Variations and Serving Suggestions
In case you wanted to change up this homemade vegan red velvet brownies recipe, these are some ideas.
- Add nuts: Fold chopped pecans or walnuts into the brownie batter for an added crunch.
- Chocolate chips: White or dark chocolate chips are also an excellent addition to the red velvet brownie batter, adding some extra decadence.
- Garnishes: Top the brownies with sprinkles to make them festive or chocolate shavings for an elegant touch.

How to Store
- Refrigerate. The frosted vegan red velvet brownies are best stored in the refrigerator, where they can last for up to a week in an airtight container.
- Freeze. Freeze the red velvet brownies on a parchment-lined sheet pan until the frosting is solid, then transfer them to an airtight container or freezer bag. They will last for up to 3 months. Thaw in the refrigerator before serving.
More Vegan Brownie Recipes
Enjoy friends! If you make this vegan red velvet brownie recipe, please snap a photo and tag #jessicainthekitchen on Instagram! We’d also love it if you would leave a comment below, and give the recipe a rating! Thanks so much!
Vegan Red Velvet Brownies
Ingredients
Brownies
- 1 cup chocolate chips, melted, (188g)
- 1 cup all-purpose flour, (133.75g)
- 1/2 teaspoon sea salt
- 2 flax eggs, or 2 vegan egg substitutes
- 3/4 cup brown sugar, I use raw brown sugar, cane sugar, or coconut sugar (158g)
- 1/2 cup oil, or vegan butter (any kind), (100g)
- 1/4 cup water
- 2 teaspoons vanilla extract, or vanilla paste
- 2-3 tablespoons natural red food colouring
- 1 teaspoon vinegar
- 1/4 teaspoon baking soda
Vegan Cream Cheese Frosting
- 8 ounces vegan cream cheese*, bring to room temperature
- ½ cup vegan butter, bring to room temperature (4 ounces)
- 2 teaspoons vanilla extract
- pinch sea salt, or vanilla paste
- 4 cups powdered sugar, sifted, (480g)
- 1/4 cup cornstarch, sifted, (32g)
Instructions
Brownies
- Preheat oven to 325°F/160°C.
- Melt chocolate chips in microwave for a minute, stirring after to see if chips have melted. If not, microwave in increments of 30 seconds until completely melted. Alternatively, you can melt in over a small pot of boiling water (Not a lot of water in the pot) and put the chocolate chips it in a heat proof and melt proof bowl over the pot and stir until melted.
- In a medium bowl, whisk the flour and salt and until combined. Set aside.
- In a separate bowl, add the flax eggs, sugar and oil and mix until combined in a mixer or by hand for about 2 minutes. Add the water, Nielsen-Massey Organic Fairtrade Madagascar Bourbon Pure Vanilla Extract and natural red food colouring and stir again for 1 minute. Add the dry mixture to the wet mixture and melted chocolate chips and stir for about 3 minutes until combined.
- In a small container, combine the vinegar and the baking soda. It will fizz! Stir quickly, add to the brownie mixture and combine once more.
- Pour into a greased, parchment lined, or a greased foil-lined 8×8 square pan. Tap the brownie pan on the counter a few times to release any bubbles.
- Bake for 35 minutes.**
- When finished, remove from oven and allow to cool completely in pan on a wire rack. Then let brownies chill in the fridge while you make the frosting (if not made already).
- Add the frosting to the brownies, then allow to chill in the fridge for at least an hour before slicing through. Slice through with a warm knife, cleaning after slice to prevent red velvet crumbs from getting all over the frosting. Serve and enjoy! These brownies are best stored in the fridge and freeze beautifully!
Cream Cheese Frosting
- In the bowl of a mixer, beat the butter and cream cheese together for about 2 minutes until fully incorporated.
- Add in the vanilla extract and the pinch of salt.
- Add in a cup of sifted powdered sugar and all of the sifted cornstarch. Mix for about 1 minute or until incorporated. Add in the powdered sugar 1 cup at a time until the frosting has reached the desired thickness.
- Place the frosting wrapped or covered into the fridge for at least 4 hours or overnight, until being used. You can enjoy it right away, but it will thicken up beautifully in the fridge.
Notes
- *If you can’t find vegan cream cheese, you can use cream cheese spread but it won’t hold up out the fridge! It’ll taste delicious though!
- **The first time I made these brownies I baked them at 40 minutes. They came out slightly fudgy, slightly cake-y, which was still an amazing contrast to the richness of the frosting. So if you want more fudgy – 35 minutes is great, if you want slightly cake-y brownies, 40 minutes is for you!
- To store: Red velvet brownies are best stored in the refrigerator, where they can last for up to a week in an airtight container.
- To freeze: Freeze the brownies on a parchment-lined sheet pan until the frosting is solid, then transfer them to an airtight container or freezer bag. They will last for up to 3 months. Thaw in the refrigerator before serving.
Disclaimer: Although jessicainthekitchen.com attempts to provide accurate nutritional information, kindly note that these are only estimates. Nutritional information may be affected based on the product type, the brand that was purchased, and in other unforeseeable ways. Jessicainthekitchen.com will not be held liable for any loss or damage resulting for your reliance on nutritional information. If you need to follow a specific caloric regimen, please consult your doctor first.


These were delicious and not too complicated! I don’t even like chocolate and I loved these! Also this is the BEST vegan cream cheese frosting I’ve been able to find
Thanks so much Tasha! We’re really happy that you enjoyed it!
Hi
This recipe looks great I just wanted to ask can I use Red Liquid Colour instead of the natural colour tht you’ve used…if yes..how much will the quantity be?
Also can I replace this recipe with eggs? Is so how many?
Thanks! Awaiting your reply.
Can wait to try this recipe 😊
Hi! Yes you can I would suggest half teaspoon to 2 teaspoons of no taste red food colouring. I hope this helps
I loooooooove your recipe!
I couldn’t make it turn red and I absolutely don’t care cause they are really yummy! My chocolate chips don’t melt so I still added the full cup of chocolate chips at the end, but I also added 1/4 cup of 100% cocoa powder to the dough.
Hi Jessica, what kind of vinegar do you use?
Hi Nina I used white!
This was my first time making brownies from scratch. The family loved them! I used the air fryer to make them so I had to make a few adjustments to the cook time.
YAY so happy you enjoyed so much Whitney!! Using the air fryer is so cool for this!
My boyfriend and I made these on Valentine’s Day. He’s not vegan, but he loved them. They came out so good!!