Olive Bread
This no-knead olive bread recipe is perfect for beginning bakers, but seasoned pros will love it too! Briny olives add extra flavour to crusty homemade bread.

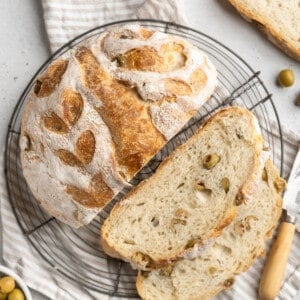
There’s really nothing better than the simple deliciousness of a loaf of crusty no-knead bread. While it’s hard to beat that original recipe, sometimes I like to add mix-ins to take it to the next level. This olive bread has the same tasty, crisp outside and soft interior as the original version, but they’re complemented by the salty kick of olives.
Whether you simply serve this olive bread with a good extra-virgin olive oil for dipping or make it a base for sandwiches, it’s sure to be a hit. The crust bakes to a perfect golden brown, giving a satisfying crunch to contrast with the soft bread and tender olives inside. This is a recipe you’ll make again and again!
(Wondering Is Yeast Vegan? Or Is Bread Vegan? I have answers!)

Why You’ll Love This Olive Bread Recipe
- Easy no-knead recipe. Perfect for beginner bakers or anyone looking to simplify their bread-making process.
- Perfect for sharing. Homemade bread is meant to be shared and enjoyed with loved ones! Everyone will be impressed by your baking skills.
- Satisfying. There’s nothing quite like making your own bread! You’ll feel a sense of accomplishment with every bite of this crusty olive bread.

Notes on Ingredients
Scroll down to the recipe card to find the ingredient quantities and recipe instructions.
- All-purpose flour – No need for any thing fancy—all-purpose flour is perfect.
- Instant yeast – Learn more: How to Test Yeast to See if it’s Still Good
- Sea salt
- Very warm water – About 120°F. It needs to be warm enough to activate the yeast, but not so hot that it kills it.
- Maple syrup, agave, or granulated sugar
- Olive oil – Or another oil you like to use for baking.
- Pimento olives – You can cut them in half for bigger bursts of flavour, or chop them more finely so they’re more evenly distributed throughout the bread.
What Should I Bake This Bread In?
You’ll need to bake your olive bread in a Dutch oven. Because a Dutch oven is covered, it locks steam from the bread inside, which is how you get that crispy-crusty exterior. I use a white Le Creuset 5.5 QT Enameled Cast-Iron Round French (Dutch) Oven, but I also adore the Lodge version, which is a lot more affordable.
How to Make Olive Bread


- Mix the dry ingredients. Whisk the dry ingredients together in a large bowl.
- Add the liquid ingredients. Form a well in the centre and add the warm water, maple syrup, and oil. Stir until the mixture comes together.
- Finish the dough. Add the olives and stir again until they’re incorporated and the dough is shaggy.
- Rise. Remove the dough and grease the bowl. Return the dough to the bowl and flip it over a few times so the dough is also greased. Cover the bowl and let the dough rise for 2 to 3 hours, or until doubled in size.


- Preheat the Dutch oven. During the last 30 to 40 minutes of rising, place your Dutch oven in the oven and preheat at 450°F.
- Fold the dough. Turn out the dough onto a lightly floured surface. Flour the top of the dough and a bench scraper or spatula. Fold the dough by pulling the edges up onto the centre and repeat 6 to 12 times, or until the dough feels tight and starts holding its shape.
- Shape the dough. Place the dough onto a piece of parchment paper and shape it into a circle. Use a sharp knife to slice a vent on the top.
- Place the bread in the Dutch oven. Use the parchment paper as a sling to drop the olive bread into the preheated Dutch oven.


- Bake. Bake the bread with the lid on for 45 minutes, then continue baking for 15 to 20 minutes uncovered. (If you’re using a gas or convection oven, bake for only 5 to 10 minutes.)
- Cool. Remove the Dutch oven from the oven and use the parchment to lift the olive bread out of the pot and transfer it to a wire cooling rack. For best results, cool completely before serving.
Tips for Success
- Measure properly. Measure your ingredients accurately. Using a kitchen scale for your flour and water will give you more consistent and better results.
- Improvise if your kitchen is cold. If your kitchen is cold or drafty, place the bowl of dough in your oven with the oven light turned on for a warm, draft-free area for it to rise.
- Preheat your Dutch oven. A hot Dutch oven mimics a professional bread oven by creating a steamy environment, giving your olive bread that beautiful crust.
- Cool before slicing. Let your bread cool down before slicing for optimal texture and flavor. Cutting too soon can lead to a gummy crumb.

Variations
Any olives will work in this bread; I also love Kalamata olives, buttery castelvetrano olives, or a combination of a few different varieties. Just make sure the olives you use are pitted!
If you’d like, you can also add some fresh or dried herbs to your no-knead olive bread. Rosemary, thyme, or oregano would all be delicious here.
Serving Suggestions
- Charcuterie boards. Make your bread the centrepiece of a vegan charcuterie board.
- Soups and stews. A rustic slice of olive bread is perfect for dipping into tomato tortellini soup or vegetable minestrone.
- Bruschetta. Top slices with tomatoes, basil, and a drizzle of balsamic glaze for an easy appetizer.
- Sandwiches. Use this bread as a base for a caprese sandwich with parsley pesto.

How to Store
Once cooled, wrap the olive bread tightly in plastic wrap or store it in an airtight container at room temperature. It should last for about 2 to 3 days. Once your bread goes stale, you can cube it and toss it with oil and toast it in the oven for homemade croutons.
Can I Freeze This Recipe?
For longer storage, you can freeze your olive bread. Wrap it in foil, then place it in a freezer bag and freeze for up to 3 months. When you’re ready to enjoy it, let it thaw at room temperature then reheat in the oven for a few minutes to restore its crispy crust.

More Homemade Vegan Breads
- Gluten-Free Sandwich Bread
- Vegan Garlic Parmesan Dinner Rolls
- Gluten Free Focaccia Bread with Garlic, Rosemary and Tomatoes
- Vegan Japanese Milk Bread
- Garlic and Rosemary Focaccia Bread
Enjoy friends! If you make this olive bread recipe, please snap a photo and tag #jessicainthekitchen on Instagram! We’d also love it if you would leave a comment below, and give the recipe a rating! Thanks so much!
Olive Bread – No Knead Recipe
Ingredients
- 4 ¾ cups all purpose flour, 570g + some extra for flouring
- 2 ¼ teaspoons instant yeast, about 1 packet (7g)
- 2 teaspoons sea salt, 12g
- 2 cups very warm water, about 120°F/48°C (472 ml)
- 2 teaspoons maple syrup, agave or granulated sugar, 13.5g
- 1 teaspoon olive oil or any oil, 4.4g
- 1 cup pimento olives, cut in half or chopped
Instructions
- In a very large bowl, whisk the dry ingredients together until thoroughly combined. Create a well in the centre and add the warm water, maple syrup and the oil. Stir the water into the dry ingredients to form a dough. Add in the olives and stir again to incorporate throughout. You want to stir until it’s all incorporated and the dough looks shaggy but mixed together, about 1 minute.
- Lightly grease the sides of the bowl, and turn the dough over in it to grease the dough. Cover with greased plastic wrap, an alternative wrap or light kitchen towel and let it rise on your counter for 2 to 3 hours. If your kitchen is cold, place it in your oven with the oven light turned ON and the oven OFF for a warm, draft free area for it to rise. The dough will double in size so be sure to use a bowl tall enough to manage this rise.
- In the last 30-40 minutes of rising, place your Dutch oven in the oven and preheat at 450°F/230°C. You want to add your Dutch before preheating so it preheats with the oven (this will ensure it doesn’t crack).
- After two hours, the dough should have bubbles on the top. Flour a surface with at least 1 tablespoon flour spread out, then pour the risen dough onto it. Sprinkle another 1/2 tablespoon of flour onto the top of the dough and flour your dough scraper/knife/large spatula.
- Using your dough scraper or large knife or spatula, fold the dough on top of itself. Do this by pulling the outer edges up and onto the centre. Rotate the dough and do it a few more times, about 6 to 12 times. You want the dough to feel a bit tighter and to start forming a shape. Feel free to lightly sprinkle more flour during this process. It should take you less than a minute.
- Scoop the dough and place onto a piece of parchment paper. Using your hands, scoop/shape it into a circle. You can use a very sharp knife to slit a line in the bread along the top to help with a design.
- When the oven is preheated, remove the dutch oven carefully with oven mitts. Take the lid off and place the dough (on the parchment paper) into the Dutch oven. Place lid back on (remember it’s hot!!) and place it all back into the oven.
- Bake for 45 minutes. After that time, open the oven, carefully remove the lid and continue to bake for an additional 15 to 20 minutes until the crust is at your desired level. If you're using a gas oven/convection oven, only do it for 5 to 10 minutes so the bottom and tips don't burn. I love mine golden brown.
- Remove from the oven, and set down. Lift up the edges of the parchment to transfer the bread to a wire cooling rack. If you want to test it for doneness, you can turn it over and lightly tap on the bottom. It should sound hollow.
- Completely cool, then slice, serve and enjoy! If you can’t wait, cool it for at least 30 minutes!
Notes
Disclaimer: Although jessicainthekitchen.com attempts to provide accurate nutritional information, kindly note that these are only estimates. Nutritional information may be affected based on the product type, the brand that was purchased, and in other unforeseeable ways. Jessicainthekitchen.com will not be held liable for any loss or damage resulting for your reliance on nutritional information. If you need to follow a specific caloric regimen, please consult your doctor first.


I do not have a cast iron Dutch oven. I have a glazed ceramic round casserole type pot with a lid. It holds about 2.2 litres of water. Any advice?!or other suggestions how to cook this?
Hi Azza,
It’s hard to tell you to half the recipe because I haven’t tested that and so I couldn’t give you an accurate baking time to halve it by too. It sounds like it’s a 2.3 QT pot (and yes if it’s a nice solid heavy bottom and a solid top, that would generally work!) – how about try it out? If it’s too big for the pot, you can try this method (so there’s no wasting):
You’re going to want to do what I did with my pizza recipe, what I call the steam method. Add a baking dish/pan with boiling hot water in your oven under the shelf of the bread. This is similar to what the dutch oven is doing.
Shape your dough as best as possible on a parchment paper-lined baking sheet in the rack above it. Then bake! You want to work fast, so you want to shape etc first, then add in your pan with boiling hot water then close the door right away! Hope that helps!
this turned out beautifully…I added half a cup of shredded jalepeno jack cheese and used halved kalamatas…sooo good…I’ll be practicing this recipe for perfection l.
Thanks so much for sharing Lisa! So happy to hear!!
I made this bread today. And I am very impressed. it tastes absolutely delicious.
I am grateful for every one of your recipes that I have tried so far. they’ve all turned out great!
Thanks so much for sharing Robin! SO happy to hear!!