Easy Vegan Lemon Curd
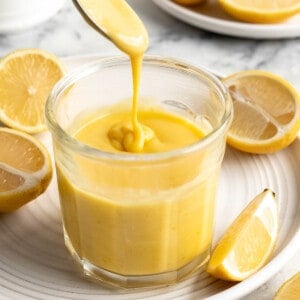
This easy vegan lemon curd has the same luxurious, creamy texture and sweet-tart flavour as the original, made without butter or eggs! You’ll love it on blueberry pancakes, desserts, or just eating with a spoon.

I love all things lemon! There, I said it. Now that I’ve got that off my chest, I can speak about this vegan lemon curd recipe with extreme bias. I used to love lemon curd before going vegan. I wasn’t sure if a vegan lemon curd could measure up to the original version, but this recipe did! This vegan lemon curd is rich and smooth, tart and sweet. Perfect for spreading on toast and scones for breakfast or shortbread and cakes for dessert. And one of my favourite things about this 20-minute lemon curd recipe is how easy it is to make.
About This Easy Lemon Curd Recipe
I used to love making regular lemon curd from scratch, though I was always aware of how temperamental it was. Here’s what makes this vegan version so simple:
- No eggs. Since vegan lemon curd doesn’t contain eggs, there’s no tempering, and less risk of overcooking.
- Enriched with coconut cream. Skim the thick, creamy part off the top of a can of coconut milk to use in the curd. Use the remaining coconut water in soups, smoothies, or use it to cook coconut rice!
- Brightened with turmeric. Amps up that bright, golden color without impacting the rich lemon flavor.
If you’re not sold yet, you really should give this recipe a try. I bet you’ll end up making it again and again!

Notes on Ingredients
Scroll down to the recipe card to find the ingredient quantities and recipe instructions.
- Fresh lemon juice – This isn’t the time to use bottled lemon juice! Fresh is best.
- Cornstarch – The cornstarch replaces the egg in this recipe, thickening the vegan lemon curd so it’s creamy and spreadable.
- Sugar – Regular granulated white sugar works best.
- Turmeric – This gives your lemon curd a nice colour even without the egg yolks.
- Coconut cream – Scoop this from the top of a can of coconut milk.
- Vanilla extract – Or, substitute an equal amount of vanilla paste.
- Lemon zest – Zest the lemons before juicing them.

How to Juice Lemons
You’ll need about 2 to 3 medium-sized lemons to get the half cup of juice needed for this lemon curd recipe. If you don’t have a juicer, you can use any of these methods instead:
- Different tools. If you don’t have a juicer, use a citrus reamer or a handheld lemon squeezer. Or, simply use your hands!
- Loosen the membranes. Use a fork or a knife to poke holes into the halved lemons and break apart the membranes so it’s easier to squeeze out the juice.
- Roll them. Another quick trick is to let the lemons come to room temperature, then roll them on the countertop under the palm of your hand before squeezing. This will help more juice come out.
How to Make Lemon Curd (Vegan Version)
If you’ve made traditional lemon curd before, you’ll appreciate that this vegan version is much less fussy! Here’s what you’ll need to do.


- Combine the ingredients. Whisk the cornstarch, lemon zest, turmeric, water, and lemon juice in a saucepan until the ingredients are fully incorporated.
- Thicken. With the saucepan over medium-high heat, whisk the curd mixture for about 6 minutes as it warms up.
- Add the sugar and salt. Once the lemon curd mixture has thickened, reduce the heat to medium. Slowly pour in the sugar while whisking, then whisk in the sea salt and vanilla. Cook, stirring, for 2 minutes more.


- Add the coconut cream. Remove the pan from the heat and vigorously whisk in the coconut cream.
- Finish. Return the saucepan to medium heat and cook for about 5 more minutes, or until the vegan lemon curd thickens. Add more sugar to taste.
- Chill. Refrigerate the lemon curd until you’re ready to serve.

Tips for Best Results
- Use coconut cream. Coconut cream is the thick white mass at the top of a can of coconut milk. If it’s warm in your kitchen, I recommend popping your can of coconut milk in the fridge a day ahead of time, as chilling will help the cream separate from the coconut water. (You can use the leftover coconut water to make smoothies. I love it in my pineapple peach smoothie!)
- Whisk well. Both the cornstarch and the coconut cream can create small lumps in the lemon curd, so be sure to whisk constantly and vigorously to break them up.
- Be patient. This vegan lemon curd really benefits from chilling, which mellows any remaining coconut flavour and thickens the curd so it’s super creamy and spreadable.
Can You Freeze Lemon Curd?
Yes, this vegan lemon curd freezes very well. Pour it into an airtight container and store for up to 3 months. Defrost in the fridge before using. The fresh vegan lemon curd can also be kept in a tightly sealed jar or container in the refrigerator for up to a week.

Ways to Use Lemon Curd in Recipes
Other than eating it with a spoon, I love using this vegan lemon curd as a topping for crepes. I also use a variation of this recipe as the filling in my vegan lemon bars! It’s very flexible, and there are many more ways to use it:
- Breakfast: Lemon curd is my favorite topping for pancakes and waffles.
- As a spread: It’s delicious spread on my vegan Japanese milk bread, biscuits, or just a slice of toast.
- Lemon desserts: Use it to make lemony desserts by layering it on vegan vanilla cupcakes, or keep it simple and serve a dollop over vegan yogurt or ice cream.
More Favorite Lemon Recipes
Enjoy friends! If you make this vegan lemon curd, please snap a photo and tag #jessicainthekitchen on Instagram! We’d also love it if you would leave a comment below, and give the recipe a rating! Thanks so much!
Vegan Lemon Curd
Ingredients
Easy Vegan Lemon Curd
- ½ cup fresh lemon juice
- 2 tablespoons cornstarch
- 6 tablespoons water
- ½ cup sugar
- tiny pinch of turmeric for colour
- 1/4 cup thick coconut cream (from the top of a can of coconut milk
- pinch of sea salt
- ¼ teaspoon vanilla extract
- 1 teaspoon lemon zest
Instructions
Easy Vegan Lemon Curd
- In an off pan whisk the cornstarch, lemon zest, turmeric, water and lemon juice until fully incorporated. Turn the pan to medium-high heat and begin to whisk for about 6 minutes as the mixture heats up. You want to whisk the entire time so the cornstarch doesn’t clump up. The mixture will begin to thicken around the 3-minute mark then continue to get thicker by 6 minutes.
- Reduce heat to medium. Slowly add in the sugar and whisk thoroughly into the curd. Add in the sea salt, vanilla and stir to combine. Stir for another two minutes. If you begin to see any lumps whisk vigorously to remove.
- Remove from heat and Stir in the coconut cream and whisk vigorously to combine again. Bring back to heat and allow the mixture to heat over medium heat for about 5 minutes more minutes until it begins to thicken up even more, stirring occasionally. Taste and add more sugar if needed for your tastebuds – it’s supposed to be sweet and tart.
- Remove from heat and allow to cool in the fridge. There’s barely any coconut flavour but any traces will be removed once it cools fully. Enjoy!
Notes
- To store: Store this vegan lemon curd in a tightly sealed jar or container in the refrigerator for up to a week.
- To freeze: Pour into an airtight container and store for up to 3 months. Defrost in the fridge before using.
Disclaimer: Although jessicainthekitchen.com attempts to provide accurate nutritional information, kindly note that these are only estimates. Nutritional information may be affected based on the product type, the brand that was purchased, and in other unforeseeable ways. Jessicainthekitchen.com will not be held liable for any loss or damage resulting for your reliance on nutritional information. If you need to follow a specific caloric regimen, please consult your doctor first.


looks good. will try the recipe out.
for the vegan lemon curd
can I use coconut sugar or truvia instead of regular sugar
Thanks
Hi Tom,
I haven’t tried it but yes it should work!
Mine came out clear yellow and gelatinous, not creamy like yours. Do you know what could have caused this? I want to try again because it tasted good.
I’m wondering if it was the coconut cream. I refrigerated it overnight but the top part was liquid like milk and not solid.
Hi Shari,
So happy you loved the taste! Do you mean yours was very thick? Trying to understand so I can properly help you!
Hi Jessica,
It was thick but not creamy, if that makes sense. It was a clear darker yellow instead of a velvetty yellow. I whisked it over heat for the length of time in the recipe. Is the coconut milk supposed to be solid? Mine was liquid like milk even though I refrigerated it overnight. It was definitely coconut cream, not coconut milk. Thank you.
Hi Shari,
Ah got you! So it’s definitely not supposed to be liquid like milk, that means some of the coconut water was probably mixed into it in the can, so it didn’t hold as much fat you get me? It’s supposed to be solid, almost like thick whipped cream. So it might be to try a different brand can of just coconut milk (and not a can of coconut cream), then refrigerate overnight like you said and use that for the coconut cream. Hope this helps!
Easy and delicious! Thank you!
Thanks for sharing Kathryn!!
can you sub maple syrup for sugar? if yes, how much?
Hi R,
Absolutely you can, 1:1 ratio!
Just made this tonight in lieu of cheesecake, cause I wanted to try out my new lemon zester! Boy does it taste nice. I thought it would make a great topping for Easter breakfast pancakes…or on toast with cream cheese instead of some more complicated dessert. (Probably both!) I love that it is well balanced between sweet and sour and so easy to make, too. I can tell the consistency will be great after refrigeration, and am so glad you helped me treat my son tomorrow morning for Easter breakfast! Thank you!
LOL! I read through your other comments and see that I had this recipe in my larder for a reason. I liked it last time I made it, too! Now I’m wondering if I shouldn’t make crepes instead of pancakes tomorrow. I know I would like them 10 times more! 🙂
Hi Randy,
So so happy to hear that this recipe turned out so well for you for a little Easter breakfast treat. Did you go with crepes or pancakes?
French Toast! So much for planning!
Still sounds absolutely delicious!!