How to Roast Garlic (Oven Roasted Garlic)
Roasting garlic is the best way to bring out its sweet, caramelized flavour. Once you know how to roast garlic, you’ll be using it in all of your cooking! Roasted garlic is super simple to make, easy to store, and delicious in loads of dishes. You’ll see!

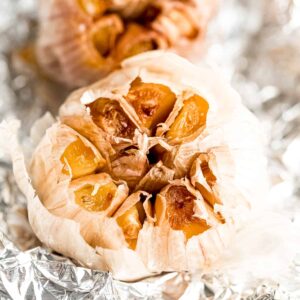
Oven-roasted garlic is easily one of my top five favourite foods! As if garlic wasn’t incredible enough, roasting brings out its flavours like you wouldn’t believe. What does roasted garlic taste like? So glad you asked. Imagine rich, buttery cloves with the smooth, mellow flavours of garlic. That harsh, pungent bite of raw garlic is gone, and in its place is garlic that’s softened, caramelized, and something you can add to countless recipes or spread over toast on its own.
Why You Should Roast Garlic in the Oven
- It’s SO easy. I’ll show you how to roast a garlic bulb in the oven using the easiest method. All you need is aluminum foil and good-quality olive oil.
- An easy way to deepen the flavours. While you can use regular garlic in recipes where I call for roasted garlic (like baba ghanoush), roasted garlic just adds that much more flavour.
- It stores like a dream. Roasted garlic lasts a long time in the fridge, and you can roast several heads of garlic at once, keeping them on hand for whenever you need them.

Roasting Garlic Bulbs vs. Garlic Cloves
I love roasting whole garlic bulbs with the skin on. It saves the time it takes to peel the garlic, plus, I find it further locks in the flavour. Of course, if you’d like to roast garlic cloves without the skins instead, that’s more than fine, too. Either way, for this simple recipe, you will need:
- Garlic – Make sure to use fresh garlic. Look for firm, plump bulbs that are heavy for their size without any green shoots sprouting up. The papery skin should be tight, not shriveled. If the cloves inside are mushy, that’s a sign that your garlic has gone off, and you’ll need to seek out a fresh bulb.
- Olive oil – A high-quality olive oil adds a rich flavor to your roasted garlic.
If you’re looking for another easy way to mellow out the flavours of fresh garlic cloves, you might also like my garlic confit recipe.
How to Roast Garlic
Roasting garlic is so easy. I think the hardest part is waiting for it to be done! These are the quick steps to follow to get your fresh garlic ready for the oven.


- Prepare the garlic for roasting. Preheat your oven to 450°F/230°C. Cut the top off of the garlic head, exposing all of the garlic cloves inside. Next, place the garlic head onto a piece of foil and drizzle olive oil over the top.


- Seal the garlic in the foil. Now, fold the foil up and around the garlic. Make sure it’s tightly sealed.
- Roast. Place the wrapped garlic head directly onto the rack in your oven. Roast for about 45 minutes, or until you peek inside to find that the cloves are lightly browned, tender, and velvety.
Use the Air Fryer
If you own an air fryer, you can use it to roast whole garlic bulbs, too. Prepare the bulbs in foil as written. Air fry the garlic at 380°F/193°C for about 25 minutes. Afterward, leave the garlic to cool inside the closed air fryer for 5-10 minutes before removing it. Check out my air fryer roasted garlic for detailed instructions.

Cooling and Peeling Roasted Garlic
Let the garlic cool for at least 10 minutes, or until you can comfortably touch it. If you’d like to keep the roasted cloves whole, carefully peel away the skins. Alternatively, squeeze the cloves out of the skins and into a small bowl. You can mash them with a fork to use the roasted garlic as a paste.
Success Tips
- Use fresh garlic. Or if not, ensure you don’t have any rotten garlic cloves in the bunch. If you cut the garlic head and see any cloves that are brown, remove them before roasting.
- Don’t rush it. I know we all look for shortcuts, but just like caramelised onions, there isn’t really a way to speed up the garlic roasting process that doesn’t cut corners on the end result. The good news is that if you make a bunch of roasted garlic all at the same time, you’ll have it on hand when you need it!
- Putting your roasted garlic to use. My favourite way to use roasted garlic is to slather it on a piece of crusty bread. You can also spread it on sandwiches, burgers, and crackers, or stir it into jarred pasta sauce.

Ways to Use Roasted Garlic in Recipes
Sweet, caramelized oven-roasted garlic is delicious mashed and spread over roasted garlic bread, or, if you’re looking for a recipe that uses roasted garlic, here are a few to try:
- Use it in the sauce for my garlic alfredo pasta.
- Add roasted garlic paste to this homemade roasted garlic tomato sauce.
- Combine roasted garlic, fresh basil leaves, olive oil, walnuts, and vegan parmesan to make easy homemade basil pesto.
- Build the flavours in a cozy roasted cauliflower soup.
- Blend roasted garlic into authentic homemade hummus or white bean dip.

How to Store Roasted Garlic
- Refrigerate. You can store roasted garlic in the refrigerator in an airtight container for about 4 days.
- Freeze it for later. Freezing is the best way to store roasted garlic so you have it on hand when you need it! To freeze, you can spread the roasted cloves on a baking sheet. Once they are frozen, store them in a sealed plastic bag. You can also mash the roasted garlic and freeze it in an ice cube tray. Store the cubes in a sealed plastic bag or an airtight container and thaw them as needed. Roasted garlic can be frozen for up to 3 months.
More Easy Roasting Recipes
- Balsamic Roasted Vegetables
- Crispy Roasted Chickpeas
- Garlic Roasted Potatoes
- Maple Glazed Roasted Carrots
- Whole Roasted Cauliflower
Enjoy friends! If you make this roasted garlic recipe, please snap a photo and tag #jessicainthekitchen on Instagram! We’d also love it if you would leave a comment below, and give the recipe a rating! Thanks so much!
How to Roast Garlic
Ingredients
- 1 head of garlic, or more
- 1 teaspoon olive oil, per head
Instructions
- Preheat oven to 450 ° F/ 230° C.
- Cut off the top of the head of garlic, with the cloves still connected, but just enough to expose them a bit. You want all the cloves slightly exposed.
- Place in some foil and drizzle a little bit of olive oil over the top.
- Wrap the foil around the garlic, and roast for 45 minutes in the oven until your cloves are soft and velvety.
- Remove from oven, and allow them to cool for about 5-10 minutes until cooled to touch.
- Remove softened cloves from the skin if using in a recipe with a knife or a tiny spoon or squeeze the cloves out. If not using immediately, refrigerate for up to 4 days (or freeze). Enjoy!
Notes
- Use fresh garlic. Or if not, ensure you don’t have any rotten garlic cloves in the bunch.
- I know we all look for shortcuts (I get it, trust me), but just like caramelised onions, there is basically no way to speed up the roasted garlic process. You could technically heat up cloves with the skin still on until they’re black, but I’ve found that just sticking a head of roasted garlic into your oven is the easiest way to get it done. Plus chances are, you’re going to want more than you need so you can use it in other recipes.
- To store: Refrigerate in an airtight container for up to 4 days.
- To freeze: Spread the roasted cloves on a baking sheet. Once frozen, store in a sealed plastic bag. You can also mash roasted garlic and freeze it in an ice cube tray. Store the cubes in a sealed plastic bag or airtight container and thaw them as needed. Roasted garlic can be frozen for up to 3 months.
Disclaimer: Although jessicainthekitchen.com attempts to provide accurate nutritional information, kindly note that these are only estimates. Nutritional information may be affected based on the product type, the brand that was purchased, and in other unforeseeable ways. Jessicainthekitchen.com will not be held liable for any loss or damage resulting for your reliance on nutritional information. If you need to follow a specific caloric regimen, please consult your doctor first.


Looks delicious! I’d like to try this tomorrow, how should I store the extra garlic pieces? Thank you in advance!!
Hi Bailey thank you for reading. You can store it in the same foil or in an airtight container.
Thanks so much! I’m vegan and I’ve tried a few of your recipes already and loved them!
You gave me perfectly roasted garlic. Thank you!
Aww yay amazing!! Thanks so much Amandalyn!!
It’s been a while since I made roasted garlic. It’s definitely a flavor booster. Thank you for the reminder
Awesome Cassandra! We’re so happy that we helped in any way!
For financial reasons I do not use my oven. could you do this in an air-fryer? The normal advice to air-fryer-ise a recipe is reduce the temperature by 10-20° & the cooking time by 20%
Hi Cathy,
Yes! I have an air fryer roasted garlic blog post, just search it in the search bar!
Great recipe. Thanks so much
You’re welcome Judy! Thanks for the review.
She is not lying! The garlic turned out SO CREAMY and amazing. We ate it for Friday dinner with some freshly baked bread from our local bakery before going out for drinks and it was dreamy. I recommend trying this so you expand your basic cooking skills. Anyways…thank you, Jessica, as always – SO GOOD.
I love this comment so much!! Thank you so much Petra!!! 🙂 🙂