Creamy Vegan Cheesecake
Creamy Vegan Cheesecake is baked, made with simply ingredients and tastes identical to regular cheesecake. It is an elegant dessert that will always please a crowd, but it’s also casual enough for an after-dinner weeknight dessert. So, whether you’re vegan or not, this rich vanilla cheesecake is not to be missed.
I don’t know about you, but I love, love, love cheesecakes. Yes, that’s right. Love times three. They are one of my favourite desserts of all time. But cheesecakes – like this Creamy Vegan Cheesecake recipe that I’m introducing you to today – are deserving of such love! Now, this is not the first cheesecake we’ve done on this blog. Remember Pumpkin Cheesecake? While these are totally tasty (and worth a try if you haven’t made them yet!), they aren’t baked cheesecakes. Vegan baked cheesecakes are like the queens of vegan cheesecakes. The texture is absolutely incredible and reminds me so much of the cheesecake I loved before going vegan. Plus after you master this base, you can easily customise it with more toppings to fit your tastes!
What Makes this Vegan Cheesecake So Good?
The word ‘cheesecake’ and the word ‘good’ just go together. It’s simply a fact that cheesecakes (if made correctly) are amazing.
But, in fairness, there are a LOT of cheesecake recipes making their way around the internet. So… what makes this specific one good?
- It’s Simple: Well, the process is a little tricky, but there’s a step-by-step guide that will break it all down – so no worries there! What I meant was, there are only 9 ingredients in this whole recipe, most of which are probably in your kitchen/pantry right now.
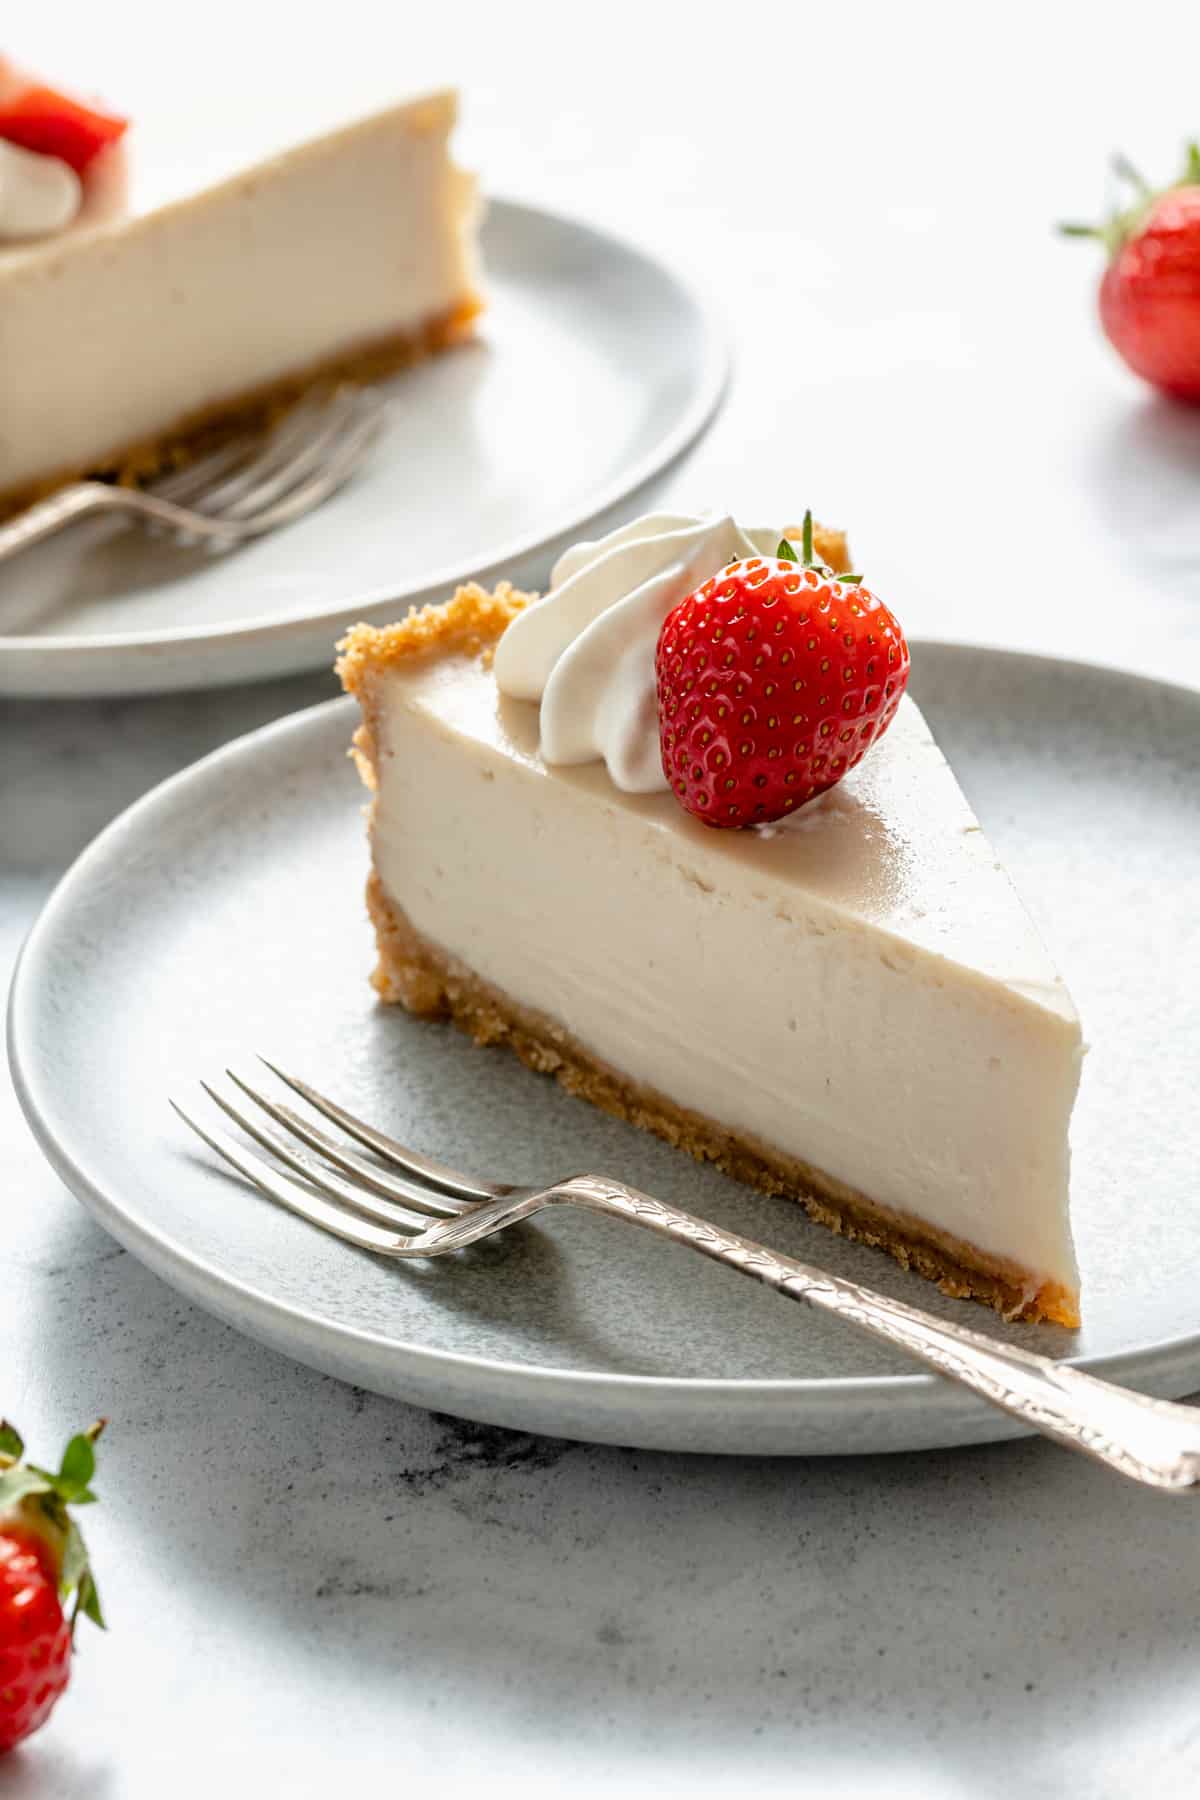
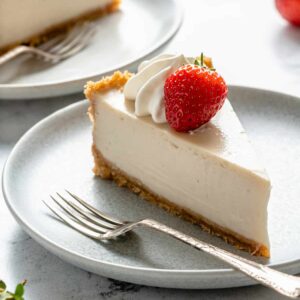
- It’s Rich and Creamy: You might have seen ‘vegan’ and thought that this can’t taste like an authentic cheesecake. But it does. It really, truly does. The cheesecake filling is so creamy and velvety, and the crust is slightly crispy, firm, and a touch crumbly. In other words, if I put a ‘traditional’ cheesecake in front of you, next to this one, you wouldn’t be able to tell the difference!
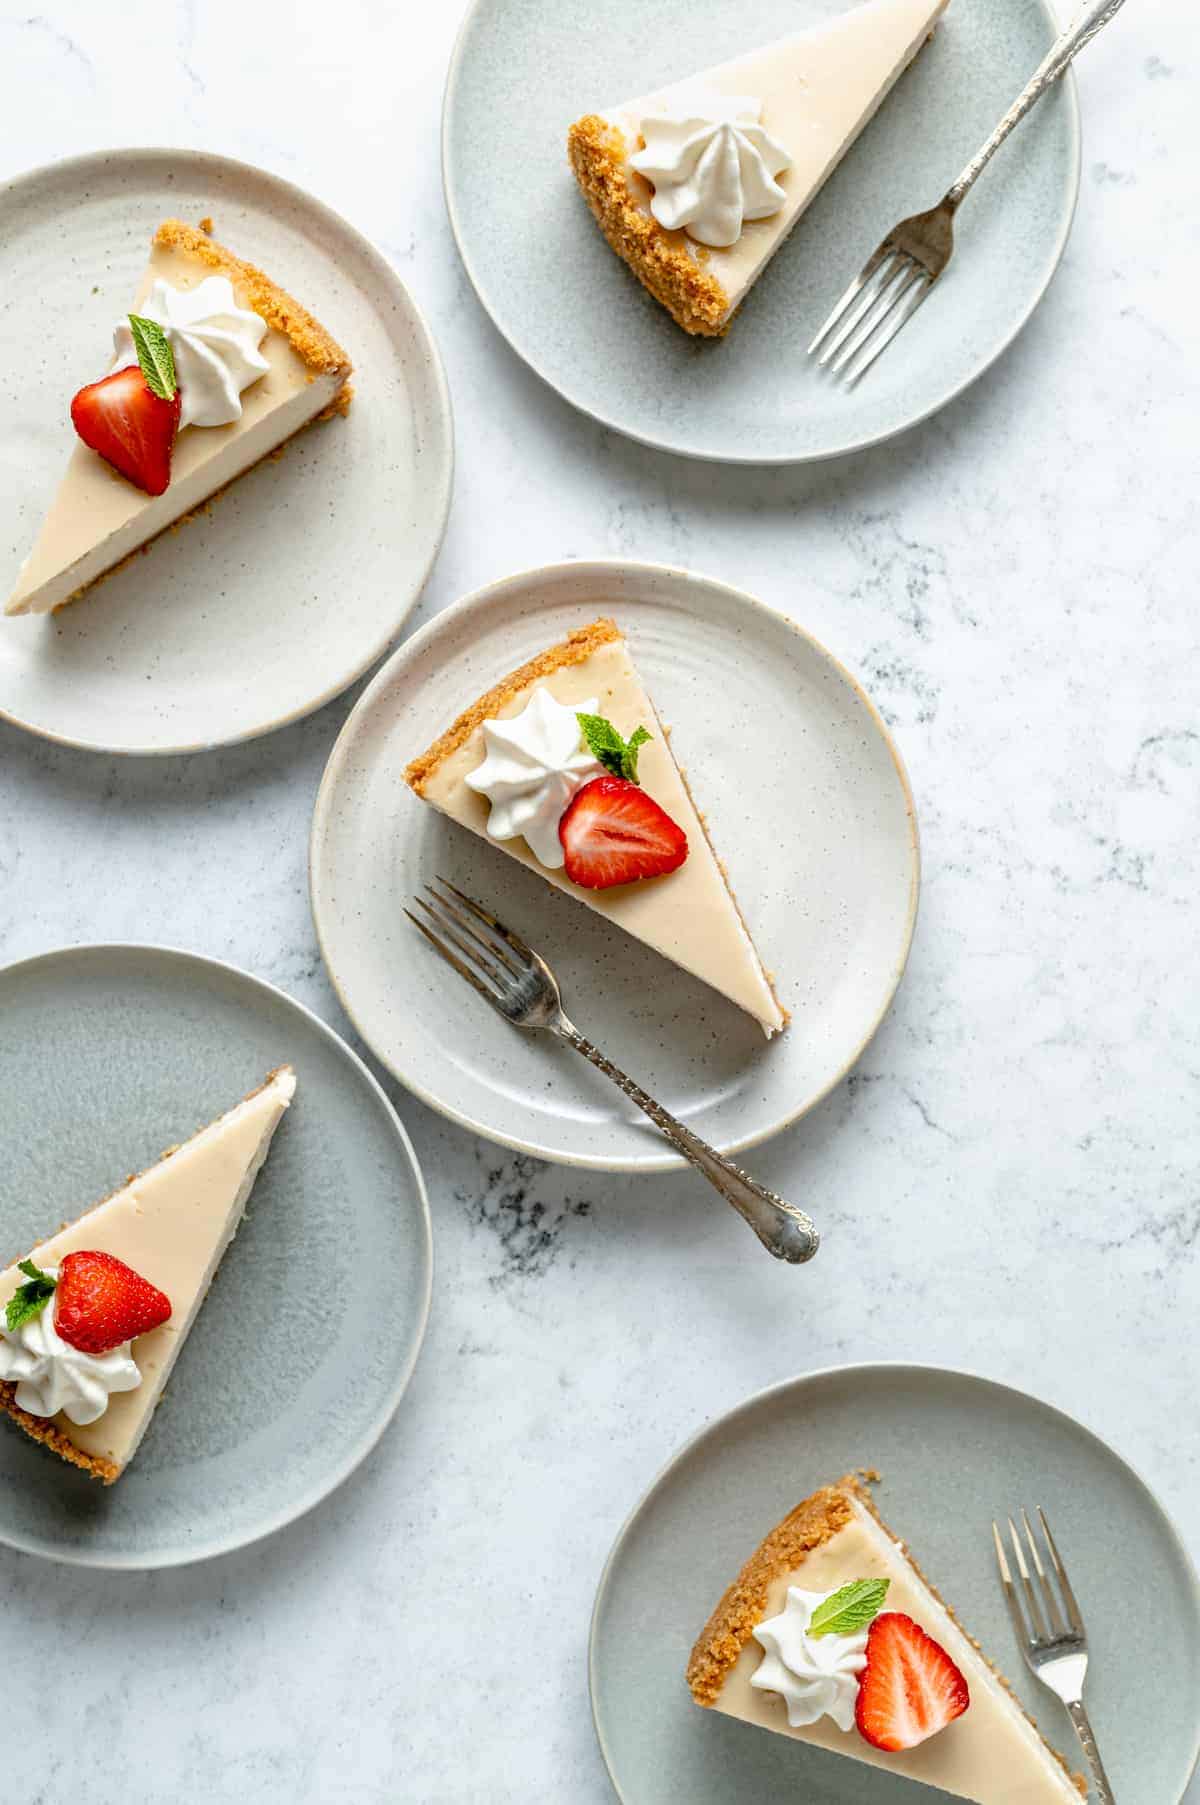
- It’s Customizable: I already kind of touched on this, but I wanted to mention it again! I love that this cake is flavorful and sweet all on its own, but can also be adjusted with bolder flavors. Feel free to add fresh fruit, homemade sauces, and more. (See serving suggestions below for ideas!)
Notes on Ingredients
I could talk about cheesecakes forever, but I’ll cut myself off here because we’ve got a dessert to make!
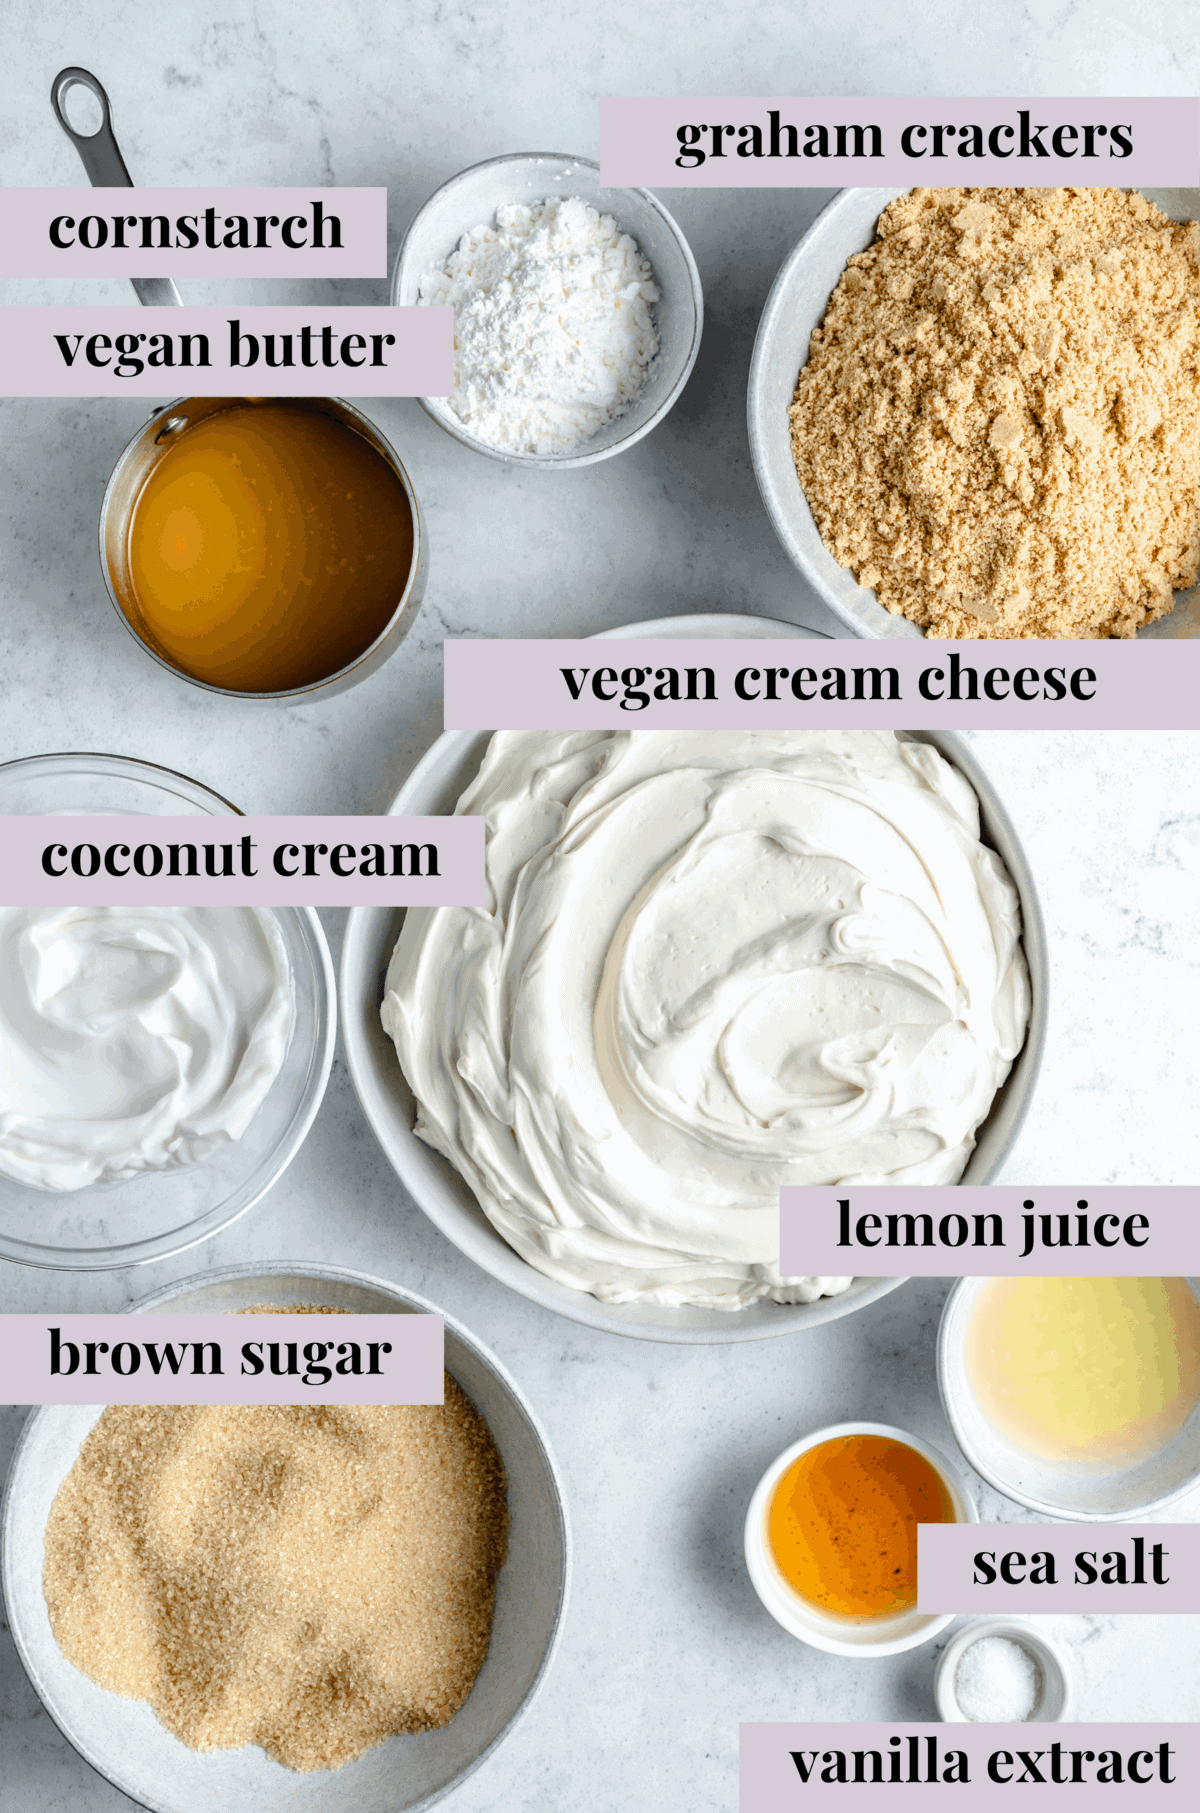
Let’s go over cheesecake ingredients for a minute. Like I mentioned above, there are only 9, and they’re pretty standard:
For the Crust
- Graham Crackers: You can also use digestive biscuits if you can’t find vegan graham crackers – I used digestive biscuits. We’re making a quintessential cheesecake crust!
- Brown Sugar: Feel free to add an extra tablespoon if you prefer a much sweeter crust.
- Vegan Butter: Salted or unsalted is fine, melted.
- Salt: Add a pinch of sea salt if you’re using unsalted butter.
For the Filling
- Vegan Cream Cheese: Let it come to room temperature before starting, and use blocks of cream cheese rather than a spread (although if you can only find a plain spread, that will work too but the cheesecake *might* crack (just cover it with toppings!).
- Brown Sugar: White granulated sugar can be used as a substitute, but I prefer to use brown sugar.
- Cornstarch: this acts as an egg replacer and helps to keep the cheesecake nice and firm.
- Coconut Cream: the thick white part from the can (you do not taste the coconut flavour at all)
- Vanilla Extract: To add some sweetness!
- Lemon Juice: if you love that incredible cheesecake tang, don’t skip this (don’t skip it anyway!). Freshly squeezed or freshly squeezed bottle is best here.
- Sea Salt: To enhance the sweetness. Highly recommend cutting this amount down *if* you’re using table salt.
How to Make Vegan Cheesecake
Okay, here’s where the real magic happens. I’m not going to lie to you, making a cheesecake takes some time and effort, but it’s so worth it.
First you’ll form the crust, then you’ll form the cheesecake’s filling, and finally you’ll put it all together to bake. That’s a bit of an oversimplification, but you’ll see what I mean:
Preheat the Oven: Adjust an oven rack to the lower-middle position and preheat the oven to 350°F/180°C.
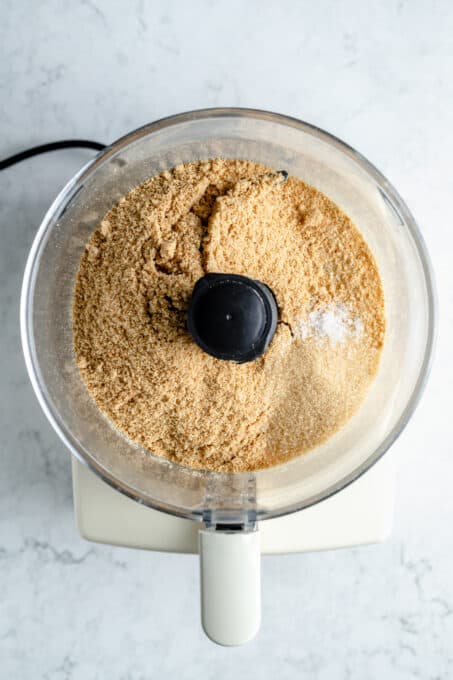
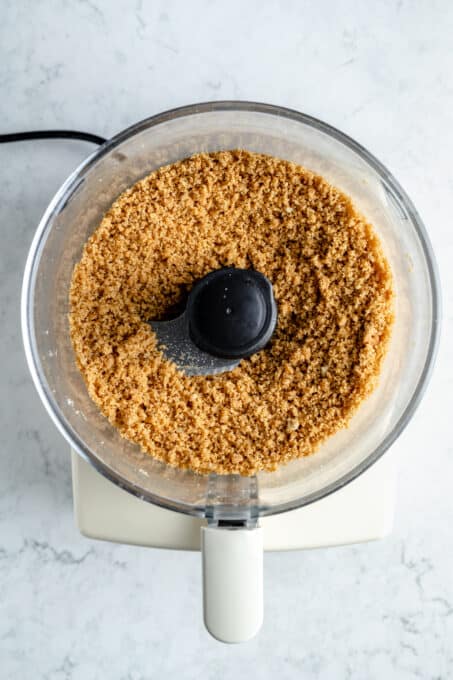
Form the Graham Cracker Crust: In a food processor, process the graham crackers/digestive biscuits and the sugar until you have fine crumbs. Add the butter while pulsing, bit by bit, for about 10 1-second pulses.
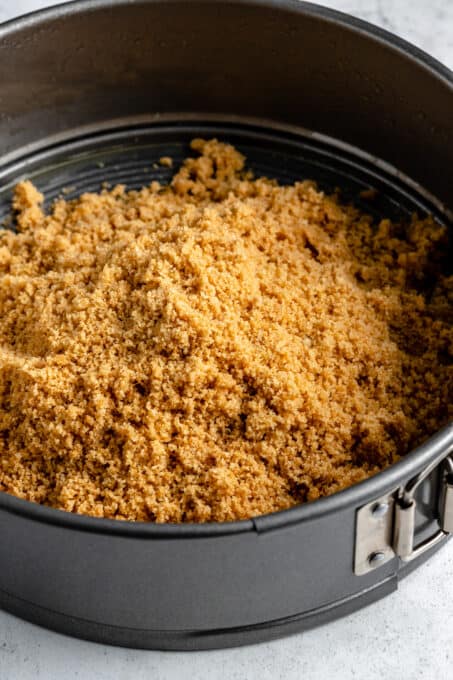
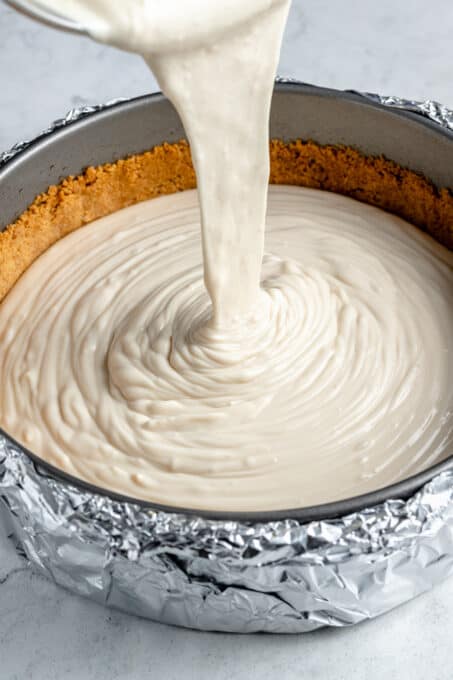
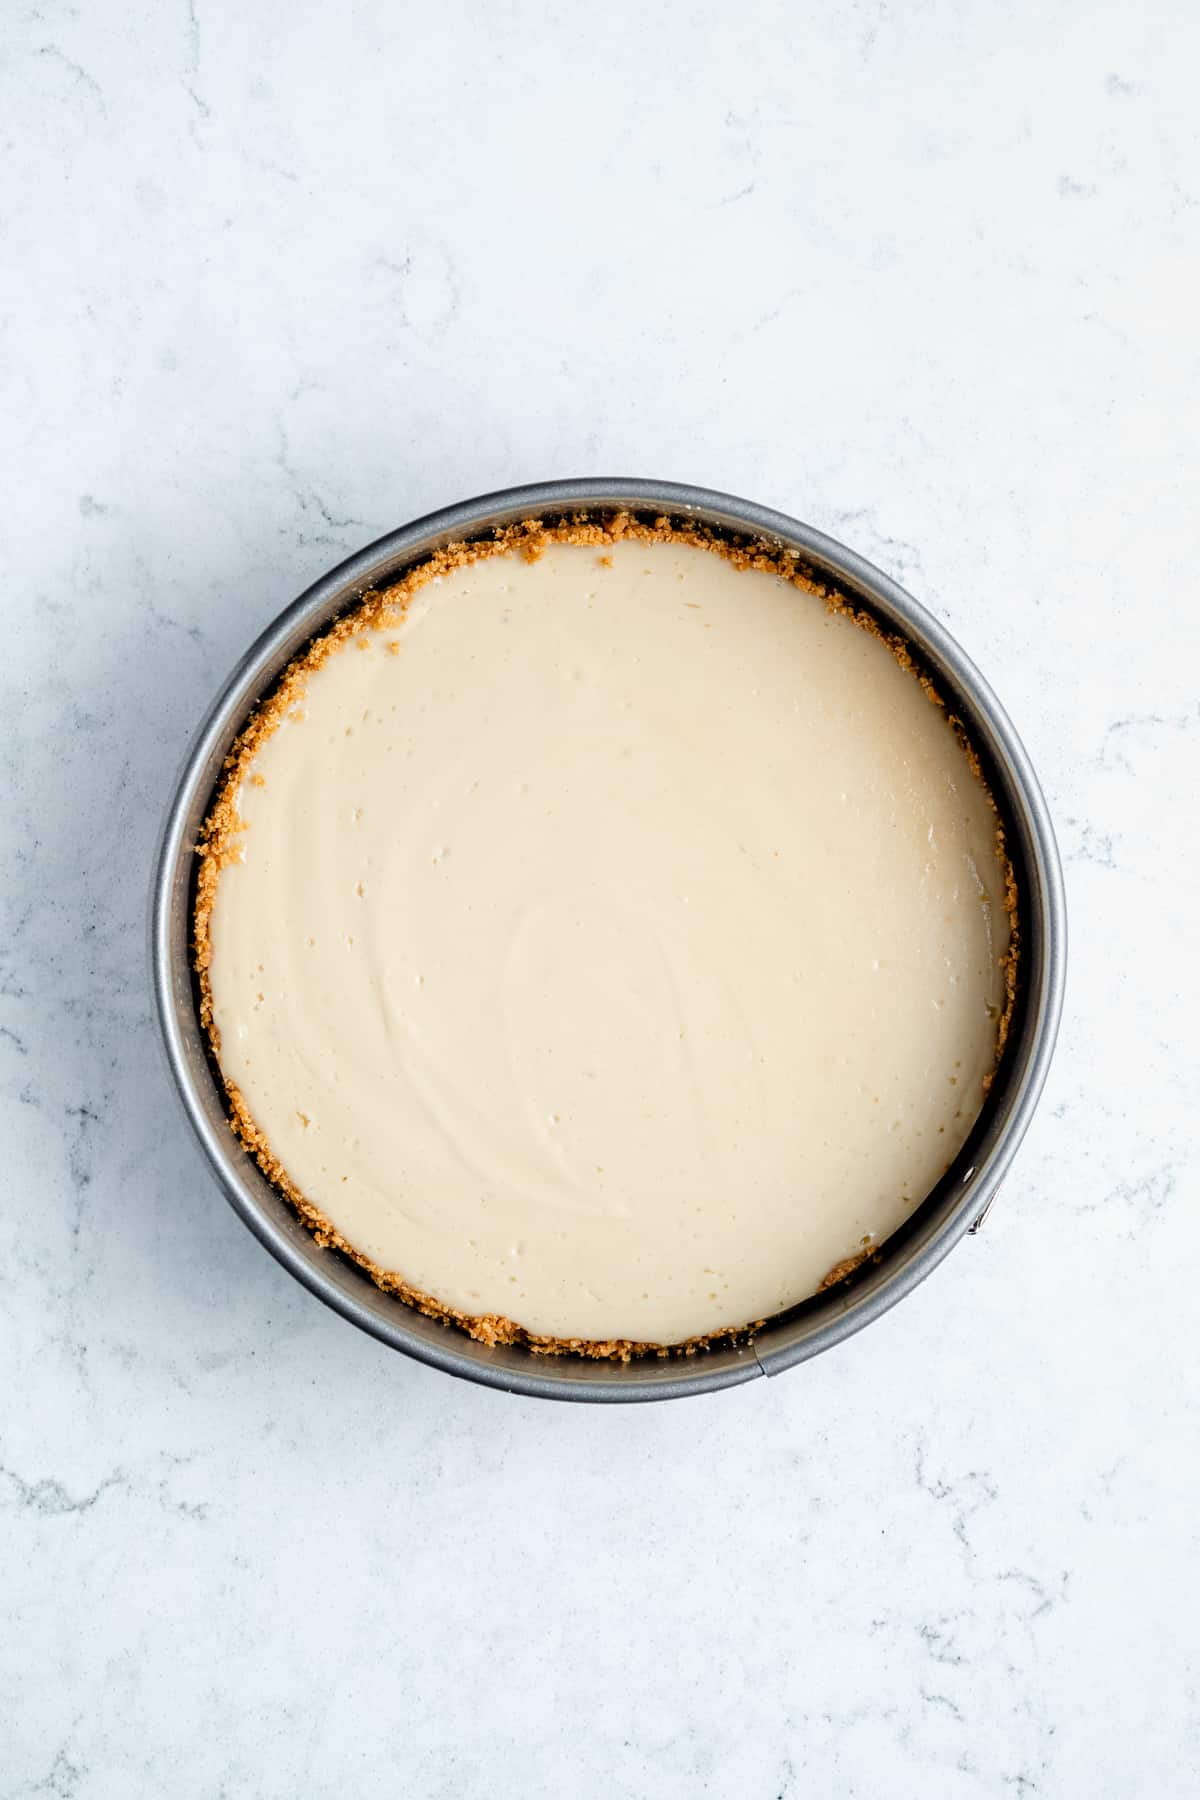
Press the Crust into the Pan: Transfer the crumb mixture to a sprayed/ buttered 9-inch springform pan and press evenly into the bottom. If desired, you could also line the pan with parchment paper but it is not necessary. Pack the crumbs into the base of the springform pan, and also slightly up the sides.

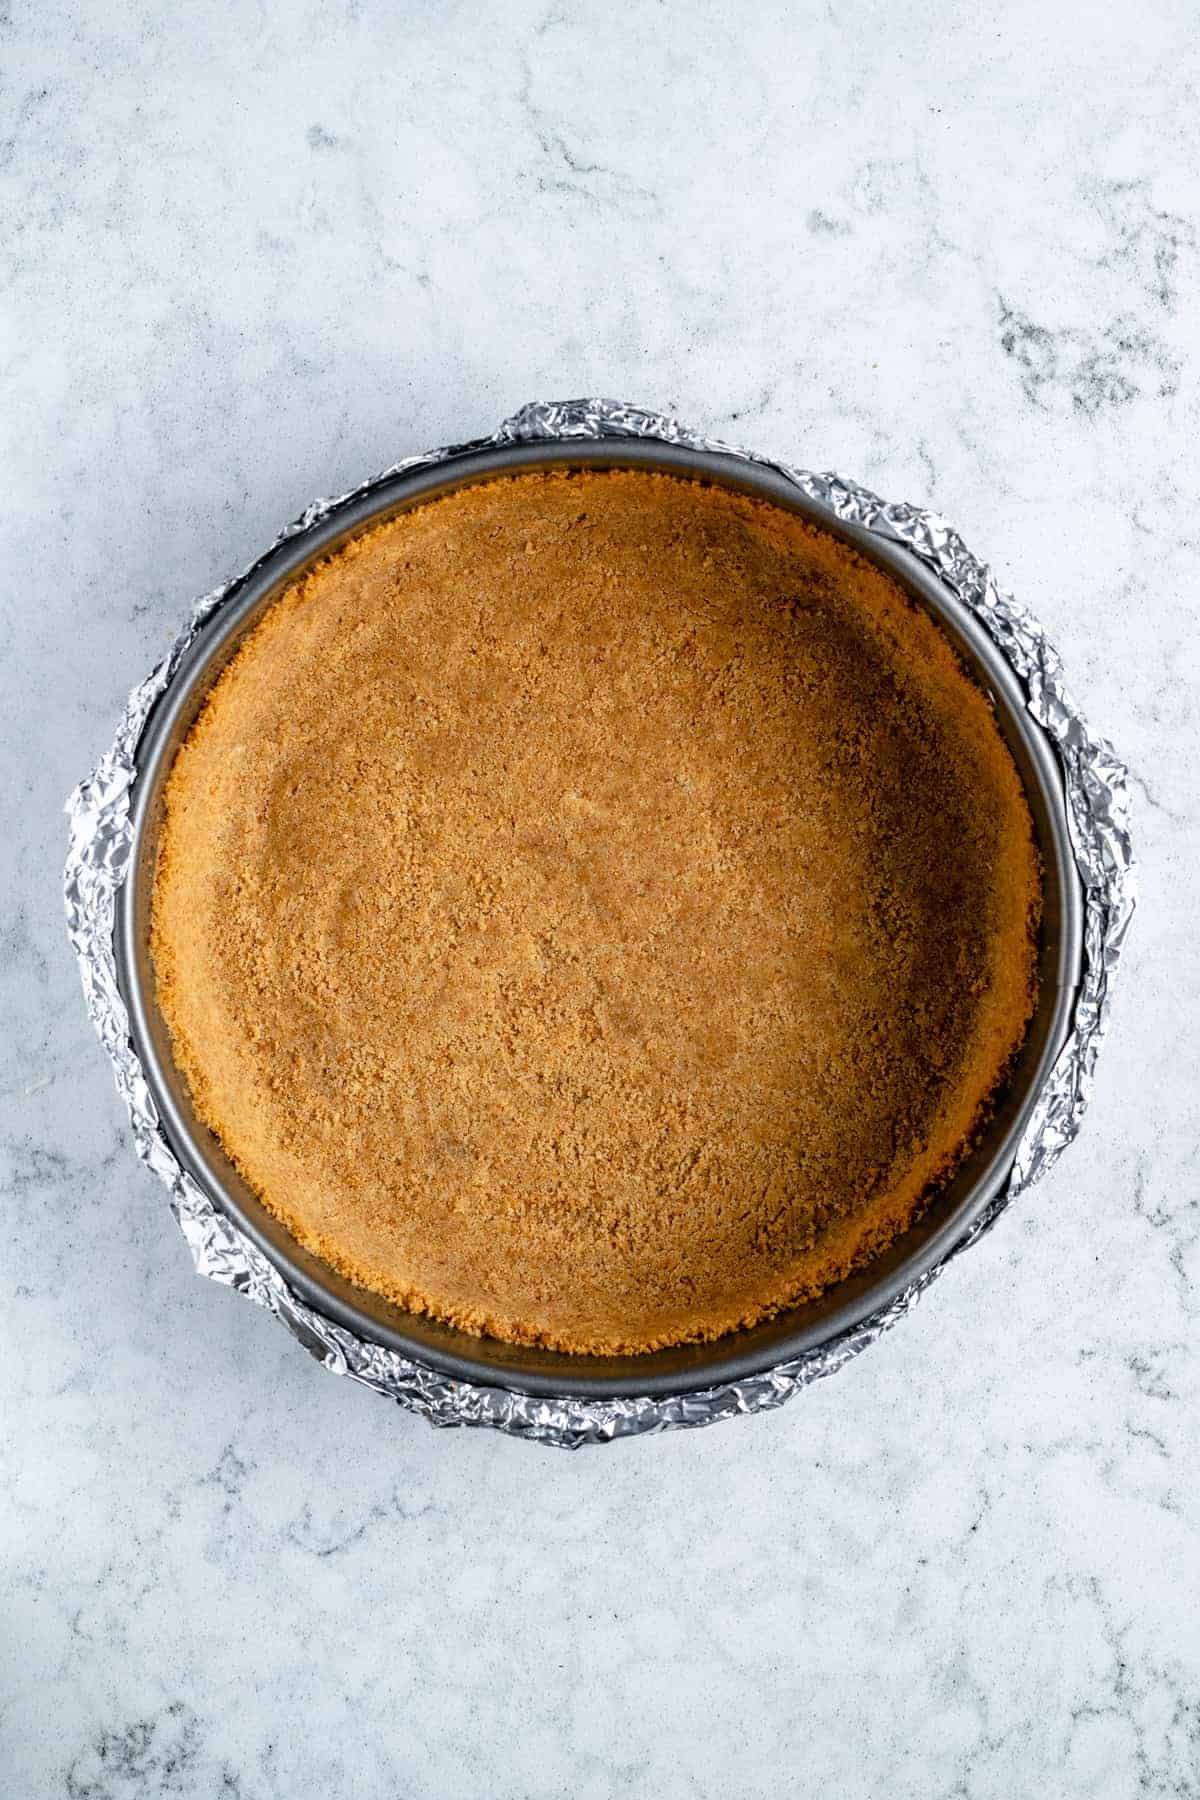
Bake the Crust: Bake for 10 minutes, until fragrant and golden brown. Remove from the oven, and cool on a wire rack to room temperature. Once cooled, wrap in aluminum foil, ensuring that the foil goes all the way up the sides and around the pan (this is for the water bath).
Adjust the Oven: Change the temperature to 325°F/165°C.
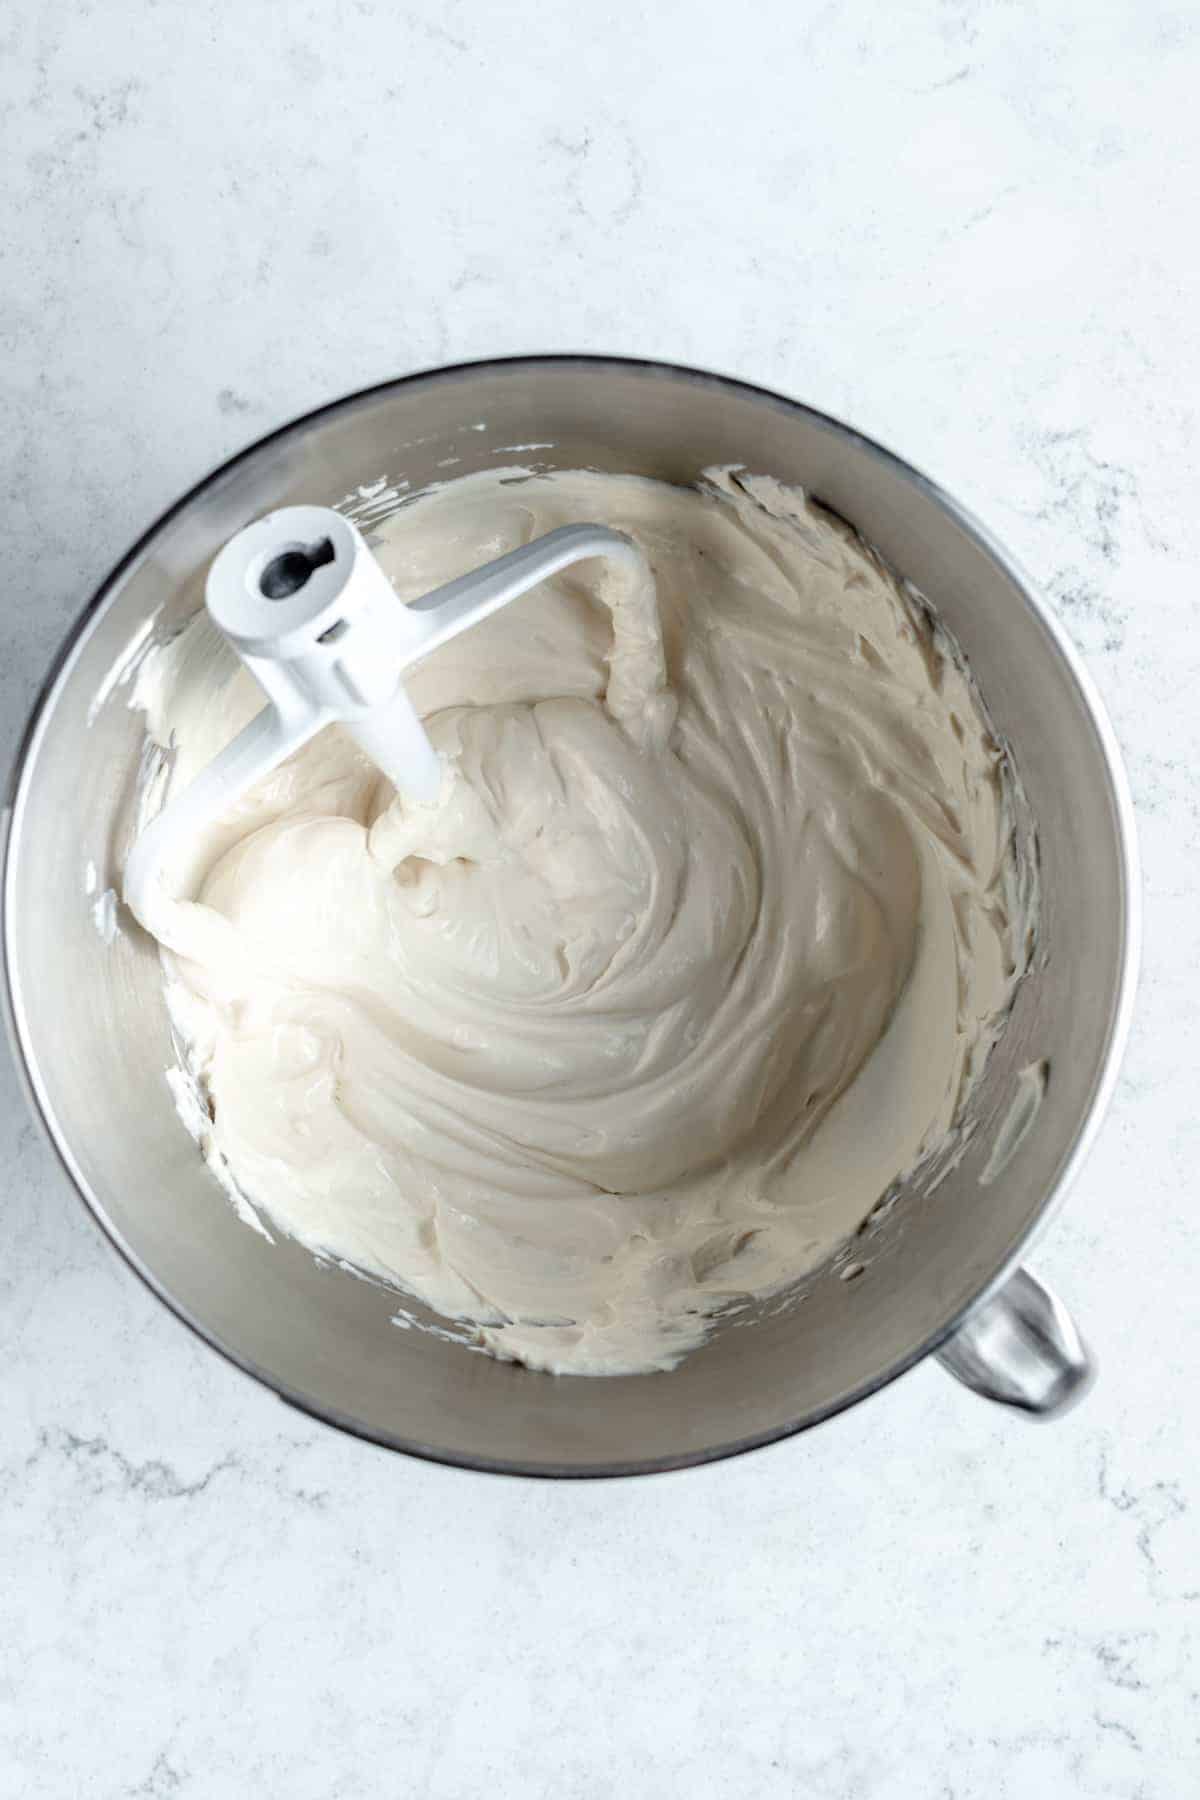
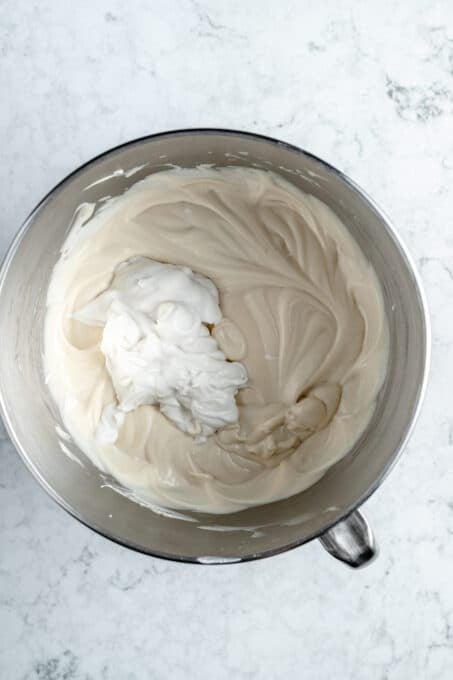
Combine Ingredients for the Filling: In a bowl of a stand mixer, beat the cream cheese to break it up and soften it slightly, about 10 seconds. With the machine running, add the sugar mixture in a slow stream; and beat until combined, creamy and smooth – about 3 minutes on low. Scrape down the sides of the bowl as needed.
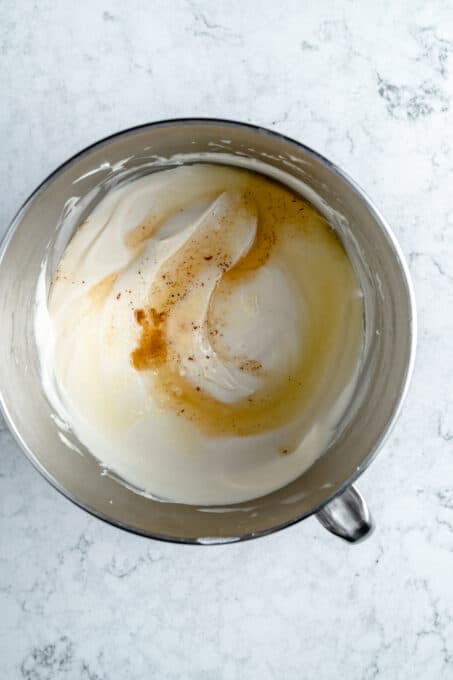
Mix in Cornstarch and Coconut Cream: Add the cornstarch mix and the coconut cream, incorporating for about 15 seconds each. Scrape the bowl after each addition. Add the lemon juice, vanilla and salt and mix to combine.

Prepare the Water Bath: Give the bowl a final scrape and pour the mixture into the prepared springform pan. Place the foil wrapped pan into a roasting pan or really any oven safe pan large enough to fit it. Pour boiling hot water in the pan and at least half way on the sides of the pan.
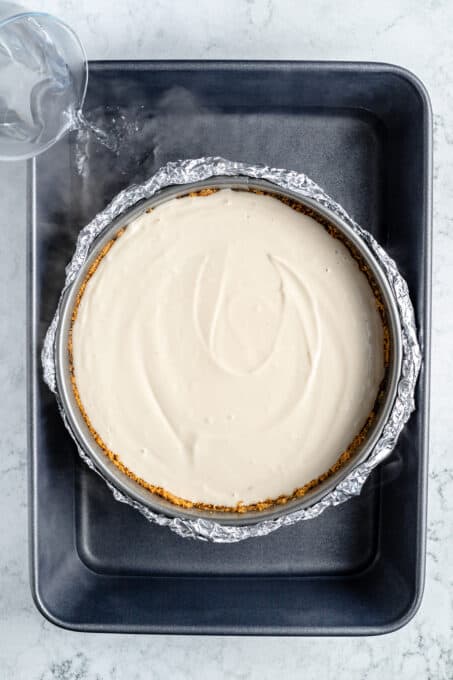
Bake the Cheesecake: Place gently into the oven on the middle rack. Bake until the center jiggles slightly, the sides start to puff, and the surface is no longer shiny, about 70 to 75 minutes and no longer.
Let the Cake Cool in the Oven: Turn off the oven and prop the door of the oven open with a potholder or wooden spoon to allow some heat to escape. Allow the cake to cool in the oven for about an hour.
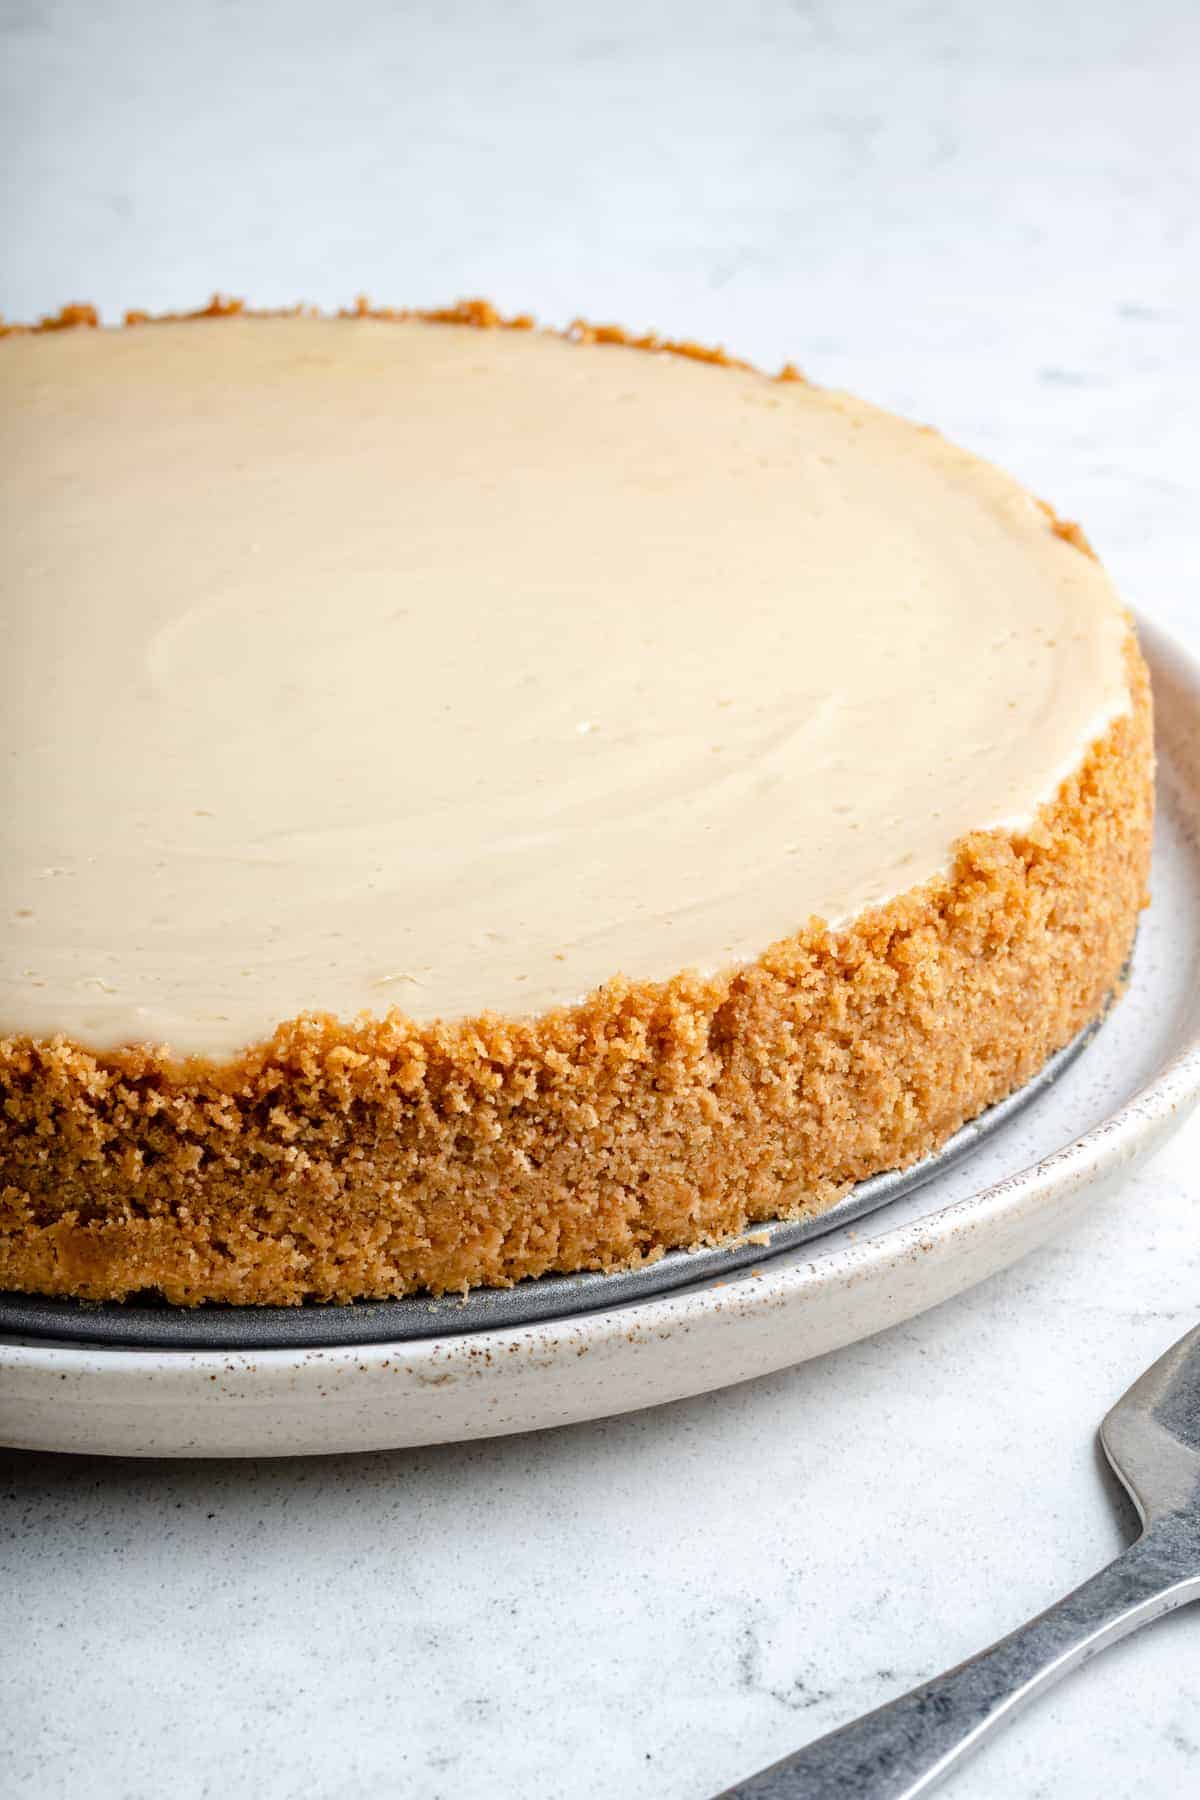
Remove the Cake from the Pan: Transfer the springform pan to a wire rack and run a small paring knife around the edges of the pan to loosen the cake. Let it sit at room temperature for anywhere between 1-3 hours to cool completely. After that, place the cheesecake in the fridge to set for at least 6 hours (overnight is even better!).
Tips for Success
Making cheesecake is complicated, as you can see, so I’ve got some substitutions and overall tips that can help you out before you start:
- How to Get the Coconut Cream: You’ll need 2 cans of full fat coconut milk in the fridge to extract the coconut cream (if you can find coconut cream itself, that’s even better!).
- How to Extract the Coconut Cream: Leave the cans in the fridge for overnight, or at least 12 hours (don’t shake them), then open and scoop off the thick white coconut cream part only.
- What to Do with the Leftover Coconut Water and Cream: You can use the coconut water in smoothies or drink it! If you have extra leftover coconut cream, you can add it to smoothies, curries, to a pasta sauce, and anything you want an extra creamy addition!
- Let ALL Ingredients Come to Room Temp: Bring all ingredients to room temperature, including the separated coconut cream already scooped out of the can. This will mean it’ll probably get thin again but that’s okay since it’s already separated from the coconut water, and that’s all we really wanted. Bringing the ingredients to room temperature also helps to mitigate developing cracks.
- A Cream Substitution to Keep in Mind: You can sub ½ cup of the coconut cream for vegan yogurt. (Instead of asking you to buy a whole host of ingredients, I figured it would make more sense to just grab two cans of coconut milk.)
- If You’re Using Digestive Biscuits: Break them up a little bit before putting them in your food processor to help it blend.
- Refrigerate the Cheesecake After Cooling: If you try to serve it immediately, it will be too soft, and probably will not hold. Chilling it in the fridge (overnight, if possible) will help the cake set and firm up a little.
- What to do if your cheesecake crust cracks: Cracks happen. When we tested this, and tested, and tested, ours didn’t (as you can see in the photos!). But sometimes you forget to bring the cheesecake to room temperature, or over beat, or your oven is wonky. Cracks aren’t that big of a deal for a still beautiful, and still delicious homemade cheesecake. But here’s where to do if it does. You can try to use a hot knife (dipped in boiling water for 15 seconds then wiped clean) and gently spread the top over to try and cover the crack. OR, Cover it with a sauce (such as a cooled fruit sauce or my Caramel Sauce), or with sliced fruit.
Serving Suggestions
Once you have the cheesecake done (finally) what should you serve with it/on it? There are a couple of different ways you could go about this. Here are my thoughts:
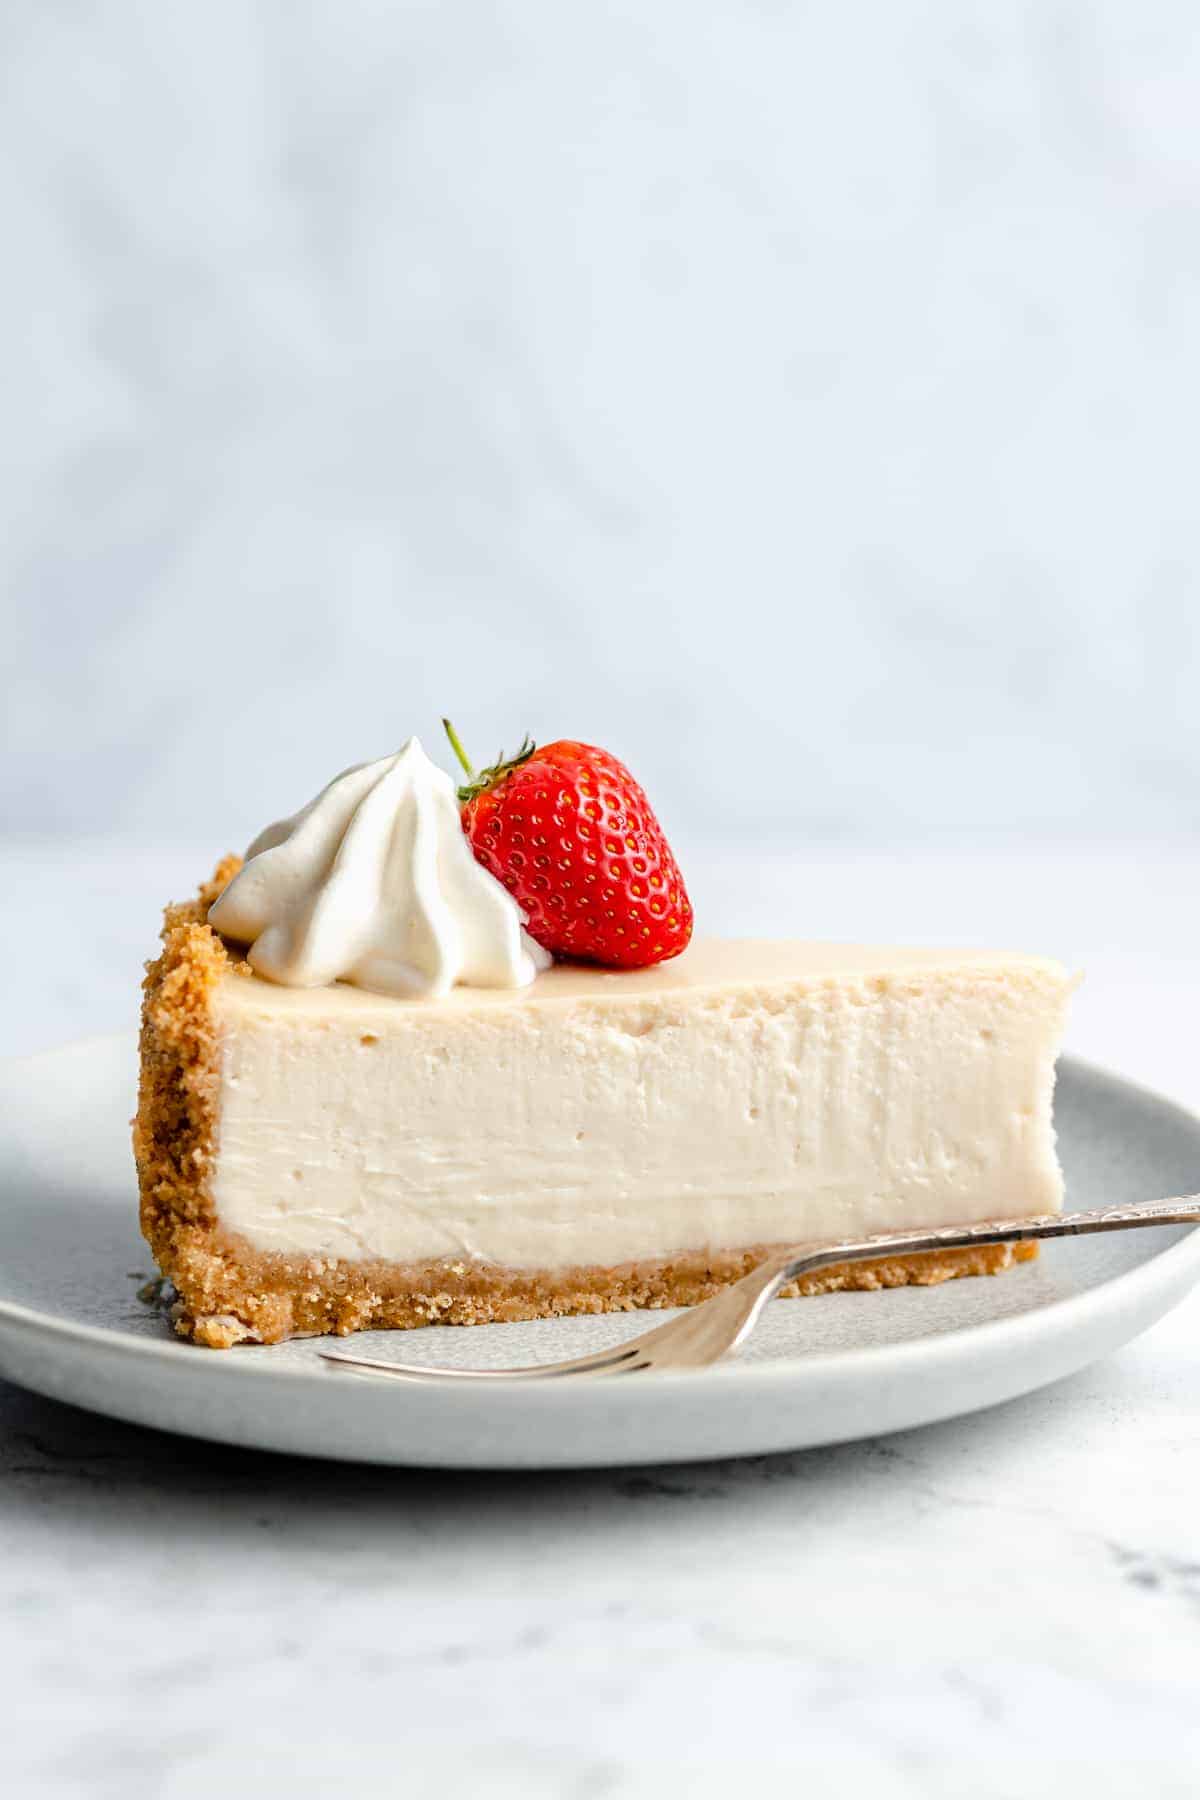
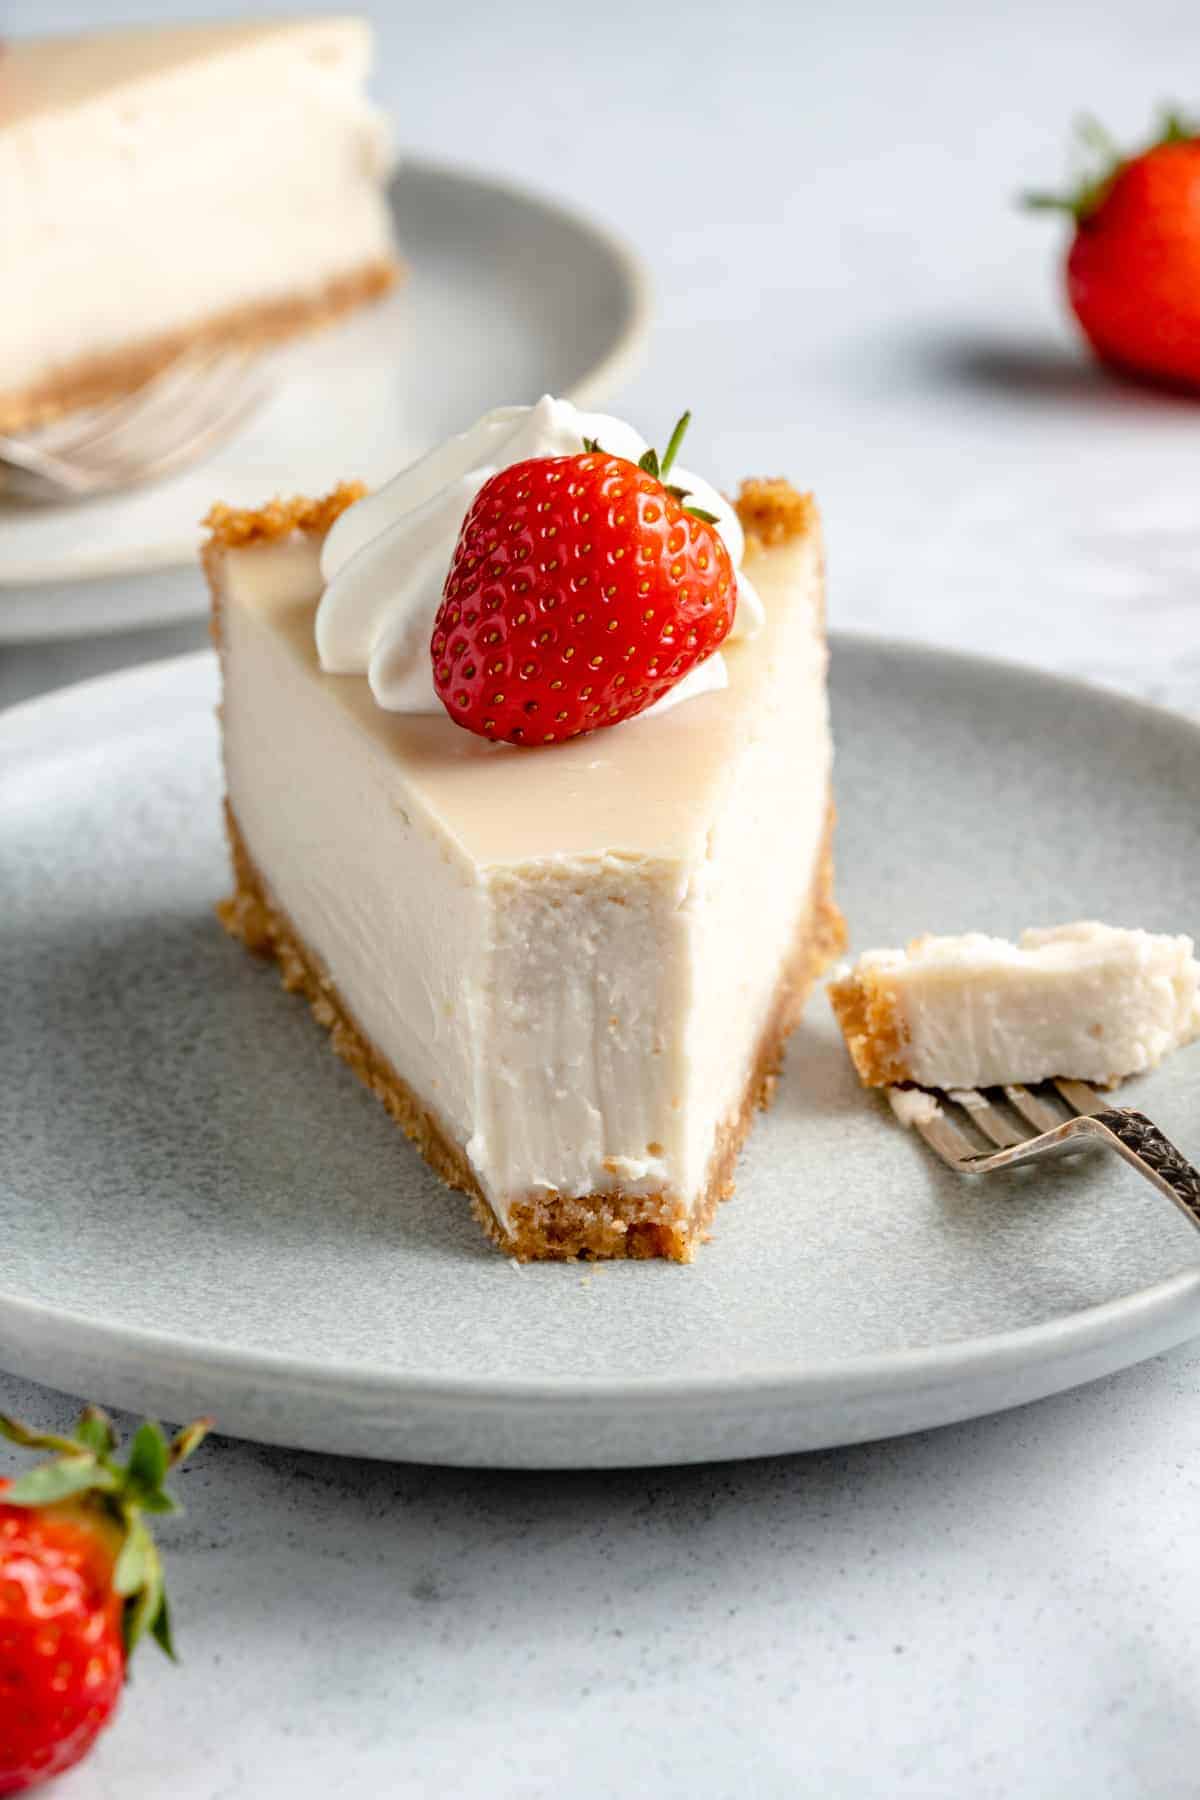
- With Fruit: I love to serve this vegan cheesecake with a strawberry on top. I think fresh fruit pairs perfectly with the rich yet subtle vanilla flavor. You can also serve a slice with raspberries, blueberries, or other sliced fruit, if desired.
- With Caramel Sauce: A drizzle of my vegan caramel sauce would taste amazing on vanilla cheesecake. You could also do chocolate sauce, or try a homemade raspberry sauce if you’re a big fan of fruit.
- With Whipped Cream: This Coconut Whipped Cream recipe is one of my go-to toppings when I’ve got something sweet on the table!
How to Store Homemade Cheesecake
Place your vegan cheesecake into an airtight container in your fridge to store properly! You could also wrap foil around it, or a reusable wrap/seal. It should keep in the fridge properly for 4-5 days – but I doubt it will take you that long to get to it!
Can I Freeze This?
You can! I like to freeze individual slices of vegan cheesecake in airtight containers so that I can save a sweet treat for when I need it. These slices generally keep for 3-4 months. Make sure you let them thaw overnight in the fridge or even for 1 hour on the counter before eating again.
Creamy Vegan Cheesecake
Ingredients
For the 10" Crust
- 12 ounces graham crackers, or 340g, use digestive biscuits if you can't find Graham crackers – I used digestive biscuits
- 4 tablespoons brown sugar, add another tbsp if you prefer a much sweeter crust
- 8 tablespoons vegan butter, or 112g, melted (salted or unsalted is fine)
- pinch of sea salt, if using unsalted butter
For the Filling
- 32 ounces vegan cream cheese, I used 4 8-ounces blocks (32 ounces/907g total)
- 1 ¼ cups brown sugar, (250g)
- 5 tablespoons cornstarch, (37.5g)
- 1 ⅓ cups full fat coconut cream, only the white part from the can (⅓ of this is stirred together with the cornstarch)
- 2 teaspoons vanilla extract
- 3 tablespoons fresh lemon juice
- ¼ teaspoon sea salt
Instructions
For the Crust
- Adjust an oven rack to the lower-middle position and preheat the oven to 350 degrees Fahrenheit/180C.
- In a food processor, process the graham crackers/digestive biscuits and the sugar until you have fine crumbs. Add the butter while pulsing, bit by bit, for about 10 1-second pulses.
- Transfer the crumb mixture to a sprayed/ buttered 9-inch springform pan and press evenly into the bottom. If desired, you could also line the pan with parchment paper but it is not necessary. Pack the crumbs into the base of the springform pan, and also slightly up the sides.
- Bake for 10 minutes, until fragrant and golden brown. Remove from the oven, and cool on a wire rack to room temperature. Once cooled, wrap in aluminum foil, ensuring that the foil goes all the way up the sides and around the pan (this is for the water bath).
For the Filling
- Change the temperature to 325°Fahrenheit/165°Celsius.
- In a bowl of a stand mixer, beat the cream cheese to break it up and soften it slightly, about 10 seconds. With the machine running, add the sugar mixture in a slow stream; and beat until combined, creamy and smooth – about 3 minutes on low. Scrape down the sides of the bowl as needed.
- In a small separate bowl, mix that ⅓ cup of the coconut cream with the cornstarch, stirring completely until the cornstarch is dissolved.
- Add that cornstarch mix and the remaining 1 cup coconut cream into the mixer, incorporating for about 15 seconds each. Scrape the bowl after each addition.
- Add the lemon juice, vanilla and salt and mix to combine.
- Give the bowl a final scrape and pour the mixture into the prepared springform pan. Place the foil wrapped pan into a roasting pan or really any oven safe pan large enough to fit it. Pour boiling hot water in the pan and at least half way on the sides of the pan.
- Place gently into the oven on the middle rack. Bake until the center jiggles slightly, the sides start to puff, and the surface is no longer shiny, about 70 to 75 minutes and no longer. Turn off the oven and prop the door of the oven open with a potholder or wooden spoon to allow some heat to escape. Allow the cake to cool in the oven for about an hour.
- Transfer the springform pan to a wire rack and run a small paring knife around the edges of the pan to loosen the cake. Let it sit at room temperature for anywhere between 1-3 hours to cool completely. After that, place the cheesecake in the fridge to set for at least 6 hours (overnight is even better!).
- Top with your favorite toppings, slice and enjoy! Place the cheesecake into an airtight container in your fridge to store properly! You could also wrap foil around it, or a reusable wrap/seal.
Notes
- How to Get the Coconut Cream: You’ll need 2 cans of full fat coconut milk in the fridge to extract the coconut cream (if you can find coconut cream itself, that’s even better!).
- How to Extract the Coconut Cream: Leave the cans in the fridge for overnight, or at least 12 hours (don’t shake them), then open and scoop off the thick white coconut cream part only.
- What to Do with the Leftover Coconut Water and Cream: You can use the coconut water in smoothies or drink it! If you have extra leftover coconut cream, you can add it to smoothies, curries, to a pasta sauce, and anything you want an extra creamy addition!
- Let ALL Ingredients Come to Room Temp: Bring all ingredients to room temperature, including the separated coconut cream already scooped out of the can. This will mean it’ll probably get thin again but that’s okay since it’s already separated from the coconut water, and that’s all we really wanted. Bringing the ingredients to room temperature also helps to mitigate developing cracks.
- A Cream Substitution to Keep in Mind: You can sub ½ cup of the coconut cream for vegan yogurt. (Instead of asking you to buy a whole host of ingredients, I figured it would make more sense to just grab two cans of coconut milk.)
- If You’re Using Digestive Biscuits: Break them up a little bit before putting them in your food processor to help it blend.
- Refrigerate the Cheesecake After Cooling: If you try to serve it immediately, it will be too soft, and probably will not hold. Chilling it in the fridge (overnight, if possible) will help the cake set and firm up a little.
- What to do if your cheesecake crust cracks: Cracks happen. When we tested this, and tested, and tested, ours didn’t (as you can see in the photos!). But sometimes you forget to bring the cheesecake to room temperature, or over beat, or your oven is wonky. Cracks aren’t that big of a deal for a still beautiful, and still delicious homemade cheesecake. But here’s where to do if it does. You can try to use a hot knife (dipped in boiling water for 15 seconds then wiped clean) and gently spread the top over to try and cover the crack. OR, Cover it with a sauce (such as a cooled fruit sauce or my Caramel Sauce), or with sliced fruit.
Disclaimer: Although jessicainthekitchen.com attempts to provide accurate nutritional information, kindly note that these are only estimates. Nutritional information may be affected based on the product type, the brand that was purchased, and in other unforeseeable ways. Jessicainthekitchen.com will not be held liable for any loss or damage resulting for your reliance on nutritional information. If you need to follow a specific caloric regimen, please consult your doctor first.
More Vegan Dessert Ideas
On the search for more easy vegan dessert recipes? If so, these are a few of my favorites:


Third time was the charm for me, though it looked like I was going to flop again when watching for non-shiny and only center-jiggle. The first two attempts were user error (incorrect ratios for smaller springform; overworked filling because too many things going on in the kitchen simultaneously.)
Now that I have finally succeeded, I can play with reducing to a more manageable size for just me.
Hi Jessica,
So so happy to hear that the third time was a hit! I totally hear you, when there’s too many things going on, things can go wrong! Thank you so much for taking a moment to share—I was so happy to read that it finally worked for you.
Hi. My electric mixer broke. Can I mix the cream cheese, coconut cream, etc with a food processor ?
Hi Liz,
We haven’t tested this out with a food processor but you could definitely give it a whirl! Let us know how it goes.
Hi Jessica, thank you for this recipe. I wanted to know if I can substitute the sugar in the crust and in the filling with honey. Let me know. Thanks.
Hi Jasmine,
We haven’t tested it out with honey but I would be a bit careful substituting a dry ingredient for a wet one when baking. It would likely lead to an incorrect texture in the crust—likely more mushy.
Hi Jasmine again
I dont have a springform pan. Can I use a 10inch cake pan? How do I get the cheesecake out of the pan? Do I follow the same instructions for baking?
Thanks.
Hi again, Jasmine!! For a cheesecake like this you’ll want a springform pan, to get it out safely. Since it’s a bit less sturdy than say—a baked pie. We haven’t tested it in other pans/different sizes so can’t say for sure how it would perform—apologies!