Vegan Banana Pudding
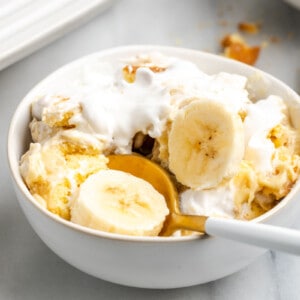
You’re going to love this vegan banana pudding, and you only need 7 easy ingredients to make it. With layers of creamy, rich vegan pudding, sliced bananas, vanilla wafers, and fluffy whipped topping, it tastes just like a traditional banana pudding. The only difference here is that there’s no dairy or eggs!

Banana pudding is a classic Southern dessert, but the traditional version is pretty heavy on dairy, and definitely not vegan-friendly. There’s milk, pudding, whipped cream on top, and in some recipes, eggs in the homemade pudding! Luckily, with a few simple ingredient swaps, like dairy-free pudding and vegan whipped cream, you can make rich, creamy vegan banana pudding at home.
This might just be the perfect vegan no-bake dessert for spring and summer: cool, creamy, and a little tropical. And the best part is, there are only 7 ingredients and minimal cooking.
Why This Is the Vegan Banana Pudding of My Dreams
- Just like the original. Friends, this is just like the classic version. Silky, banana-infused pudding on the bottom, layers of soft vanilla wafers, and fresh banana slices. Then, there’s fluffy whipped cream on top. Ooh yes.
- No dairy or eggs. I use dairy-free pudding, plant-based milk, and vegan whipped cream. Because there’s no eggs, there’s no need for tempering and the pudding cooks very quickly.
- It couldn’t be easier. This banana pudding is incredibly easy to make, with only 7 ingredients!

Notes on Ingredients
Scroll down to the recipe card to find the ingredient quantities and recipe instructions.
- Cook & Serve Vanilla Pudding – Jell-O cook and serve pudding is gluten-free and vegan, while 365 Everyday brand vanilla pudding is vegan.
- Cornstarch – To thicken the pudding.
- Non-dairy milk – You’ll want to use an unflavoured, unsweetened variety for this recipe.
- Vanilla extract – Or equal parts vanilla paste.
- Vegan vanilla wafers – The last I checked, 365 Everyday brand vanilla wafers are vegan.
- Bananas – Choose firm, ripe bananas for banana pudding. They shouldn’t be overripe or mushy.
- Vegan whipped cream – A tub of your favorite vegan whipped topping is perfect here. You could also use homemade coconut whipped cream.
How to Keep Bananas From Turning Brown
Bananas brown the fastest when exposed to oxygen, so the bananas layered in the middle of the pudding should be fine for a few days. For the bananas on top of the pudding, you can use firm, just-barely-ripe bananas and brush them with orange or pineapple juice to slow the oxidation process. Lemon juice works too, but orange and pineapple juice work better with the flavour of banana pudding.
Unfortunately, it’s hard to completely prevent the bananas from turning brown, but don’t worry. Browned bananas are still perfectly fine to eat!

How to Make Vegan Banana Pudding
There aren’t any special techniques needed to make this vegan banana pudding. It’s easy as can be!


- Make the pudding. Whisk the non-dairy milk, pudding mix, and cornstarch in a small saucepan set over medium heat. Stir constantly until the mixture begins to thicken and bubble. Remove from heat and let the pudding cool for a few minutes.


- Mash the bananas. Place the bananas in a large bowl and coarsely mash them. For a completely smooth pudding, you can also puree them in a blender.
- Finish the pudding. Add the pudding to the bowl with the bananas, along with the vanilla extract. Fold everything together.


- Chill. Cover the pudding with plastic wrap, pressing it so it touches the top to prevent skin from forming. Refrigerate for 1 to 2 hours, or until completely cool.
- Add the whipped cream. Fold half of the whipped cream into the chilled pudding.


- Assemble. Spoon 1/4 of the pudding into a 9×9-inch baking dish. Add a layer of wafers and banana slices, half of the remaining pudding, then another layer of cookies, bananas, and pudding. Chill for at least 4 hours, or up to 24 hours.
- Garnish and serve. Before serving, garnish the top with the remaining whipped cream and additional cookies or banana slices, if desired.

Tips for the Best Banana Pudding
- Use ripe, but still firm bananas. You want to strike the right balance between over-ripe soft bananas, and under-ripe firm ones. Over-ripe bananas will turn brown faster, but under-ripe bananas won’t add much flavor. Use bananas that are yellow, without a lot of brown spots.
- Cover the bananas. Make sure the top pudding layer completely covers the bananas to help keep them from turning brown.
- Don’t garnish until you’re ready to serve. This will keep the bananas looking fresh and the wafers on the top nice and crispy.
Try These Variations
This vegan banana pudding recipe leaves a lot of room for customizing. Here are some ideas:
- Graham crackers. Swap the vanilla wafers for graham crackers.
- More fruit. Switch out some of the bananas for fresh berries or diced mango.
- Coconut. For an extra tropical twist, use coconut pudding instead of vanilla and add toasted coconut on top.

How to Store Leftovers
- Refrigerate. Assuming you don’t eat it all in one sitting, store leftover vegan banana pudding in an airtight container in the refrigerator for 3 to 4 days.
- Freeze. This vegan banana pudding does not freeze well. While you can freeze it, the texture and flavor can change significantly when frozen, and it will only last for a week or two in the freezer.
More Banana Recipes
Enjoy friends! If you make this vegan banana pudding, please snap a photo and tag #jessicainthekitchen on Instagram! We’d also love it if you would leave a comment below, and give the recipe a rating! Thanks so much!

Vegan Banana Pudding
Ingredients
- 1 – 4.6 ounce pkg Cook & Serve Vanilla Pudding, 130 grams
- 3 Tablespoons Cornstarch, 24 grams
- 2 Cups Non-Dairy Milk, 480 ml
- 1 teaspoon Vanilla
- 10 ounces Vegan Vanilla Wafers, 283 grams
- 5-6 Bananas
- 12 ounces Vegan Whipped Cream
Instructions
- Combine non-dairy milk, pudding mix and cornstarch in a small saucepan. Whisk together until the dry ingredients are incorporated. Cook over medium heat, stirring constantly, until it begins to thicken and just starts to bubble. Remove from heat and cool for a few minutes.
- Mash two of the bananas to a wet pulp. If you don’t want any chunks in the pudding, you can also puree them in a blender.
- Transfer the warm pudding to a large bowl. Add the mashed bananas and vanilla. Fold together.
- Cover the pudding with plastic wrap making sure to press the plastic to the top of the pudding to prevent a skin from forming. Refrigerate 1-2 hours until completely cool.
- Remove chilled pudding from the refrigerator. Add half of the whipped cream to the pudding and fold together.
- Using a 9×9 baking dish, begin assembling the banana pudding. Start with a layer of pudding (about 1⁄4 of the total amount of pudding), followed by cookies and then banana slices. Then spread 1⁄2 of the remaining pudding over the banana layer and repeat with cookies, bananas and the remaining pudding. Make sure the top pudding layer completely covers the bananas to help keep them from turning brown.
- Refrigerate for 4 hours or up to 24 hours before serving.
- Immediately before serving, decorate the top with the remaining whipped cream and some additional cookies or banana slices if desired.
Notes
- 365 Everyday brand Vanilla Wafers are vegan
- Jell-o brand cook & serve pudding is gluten free & vegan
- 365 Everyday brand Vanilla pudding is vegan
Disclaimer: Although jessicainthekitchen.com attempts to provide accurate nutritional information, kindly note that these are only estimates. Nutritional information may be affected based on the product type, the brand that was purchased, and in other unforeseeable ways. Jessicainthekitchen.com will not be held liable for any loss or damage resulting for your reliance on nutritional information. If you need to follow a specific caloric regimen, please consult your doctor first.


What are vanilla wafers? For an international audience, please describe or give a substitute.
Hi Lt Charmin,
They are like like vanilla flavoured cookies! They melt easily in your mouth. Hope this helps!
Hi there
Where do you find the wafers in the UK please? The only place I can see is Amazon but the shipping is 😳😳😳
Hi! If you can’t find them a kind of tea biscuit should also work!! I hope this helps! But you might coincidentally find that at a large supermarket or speciality store maybe?
I made mine with oreo/gram crackers instead of vanilla wafers. I used some M&M’s and pears. I incorparated pears into the pudding mix and used the oreo cookies and gram crackers as a layer (instead of the vanilla wafers.) I sprinkled M&M’s on there as a layer as well along with bananas. I made the whipped cream coconut flavor. This was not your run of the mill banana pudding.
Hi Tee Tee!
Wow—sounds absolutely epic! Thank you for sharing this fun variation you made!
Delish! Made mine a ‘Nanna Pudding Pie with a few changes to suit my eaters. Used a purchased GF graham cracker pie crust & filled with only 1 box of the prepared pudding/mashed banana mix. Topped with GF Vanilla Wafers (Partake brand is top-9 allergen-free & vegan) in circular patterns. At serving time, topped with Oat Milk Whipped Cream & crushed wafers for garnish. (Skipped banana slices due to taste & texture preferences.) SO GOOD. Thank you for the inspiration!
Thank you for sharing! Really sounds like you made it your own!