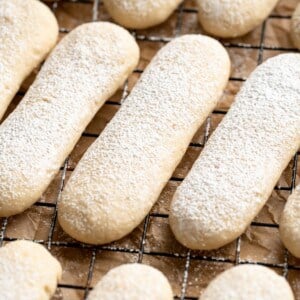
Vegan Ladyfingers
These vegan ladyfingers have the same perfect sponge cake texture and delicate vanilla flavour as the traditional version, but they’re made without the eggs thanks to aquafaba!

When I shared my Vegan Tiramisu recipe, readers loved it—but they also loved the vegan ladyfingers component of the recipe on its own. And you know what? So did I! I’ve made them on their own too; they’re perfect as a little sweet treat with a cup of coffee, or you can use them in other recipes, like a vegan Charlotte cake. Since it took me a while to perfect that vegan ladyfinger recipe, it felt like a shame to bury them in a post about tiramisu. They deserve a post of their own!
Why I’m Over the Moon for These Vegan Ladyfingers
Here’s why I adore this recipe and know you will too!
- That perfect ladyfinger texture. Traditional ladyfingers get their texture from eggs, which obviously isn’t an option for a vegan ladyfinger recipe. While there are a lot of egg substitutes out there, I knew that only aquafaba was up to the challenge of creating that light, airy texture.
- Simple sweet treat. Sometimes you just want a little taste of something sweet after dinner, or to go with your afternoon Dirty Chai Latte. Ladyfingers are perfect for that!
- Fun baking project. This isn’t quite as easy as making Vegan Sugar Cookies, but it is a recipe you’ll love if you enjoy baking. The ladyfingers are piped onto the baking sheet, similar to Aquafaba Meringue, just in a different shape!

Notes on Ingredients
Here’s a look at the key ingredients that make this vegan ladyfinger recipe work. Scroll down to the recipe card to find the ingredient quantities and recipe instructions.
- All-purpose flour – Or a 1:1 gluten-free flour formulated for baking.
- Cornstarch – This helps give the ladyfingers structure and contributes to their texture.
- Sea salt
- Baking powder
- Aquafaba – This whips into a consistency similar to egg whites.
- Cream of tartar – Stabilizes the aquafaba and improves its volume.
- Powdered sugar – Here’s how to make Homemade Powdered Sugar.
- Vanilla extract – You can swap in almond extract for a slightly different flavour.
- Vegan butter – I love my homemade Vegan Butter, but you can also use store-bought butter for this recipe.
What Is Aquafaba?
Aquafaba, which translates to “bean water,” is literally that—the liquid poured off of canned or cooked chickpeas. It’s popular with vegans because it has the unique ability to replicate the texture and properties of egg whites in baking. When whipped, aquafaba creates a light and airy foam, making it an excellent substitute for meringues, mousses, and other recipes that call for egg whites. Learn more here: What Is Aquafaba?
How to Make Vegan Ladyfingers
Here’s a visual overview of the steps involved in making this vegan ladyfinger recipe.


- Prepare. Preheat your oven to 350°F and line two baking sheets with parchment paper.
- Mix the dry ingredients. Sift the flour, cornstarch, salt, and baking powder into a bowl, then stir everything together.
- Whip the aquafaba. Whip the aquafaba and cream of tartar in a stand mixer set to medium speed for a few seconds, then increase to high speed and continue to whip until stiff peaks form.


- Add the powdered sugar. Reduce the mixer speed to low and slowly beat in the powdered sugar. Return the speed to high and whip until shiny ribbons form.
- Add the vanilla and butter. Reduce the speed again and beat in the vanilla and butter. Once they’re incorporated, whip on high for 1 minute.


- Finish the batter. Use a spatula to fold the sifted flour mixture into the aquafaba mixture in three additions.
- Pipe the batter. Transfer the batter to a piping bag or zip-top bag with a corner snipped off. Pipe 3-inch ladyfingers onto the baking sheets, leaving an inch of space between each.


- Bake. Place the pans in the oven and bake for 15 minutes, or until the edges are golden and the centers are set. Cool on the baking sheets for 5 minutes, then transfer to a wire rack to finish cooling.
Tips for Success
These additional tips will help you get perfect vegan ladyfingers!
- Make sure your mixing bowl is clean. The mixing bowl and whisk need to be completely clean and free of grease before whipping the aquafaba; even small traces of oil can prevent it from reaching stiff peaks.
- Use room temperature aquafaba. Cold aquafaba may take longer to whip and it doesn’t achieve the same volume as room temperature aquafaba.
- Fold gently. Be gentle when folding the dry ingredients into the aquafaba to avoid deflating the mixture. You don’t want flat, dense ladyfingers!

Serving Suggestions
Aside from eating as-is with a dusting of powdered sugar, layering into tiramisu, or using for Charlotte cakes, you can make your vegan ladyfingers into little sandwich cookies by spreading jam or vegan chocolate hazelnut spread onto the bottom of one ladyfinger and gently pressing another to sandwich the filling between them.
How to Store
- Room temperature: Let the ladyfingers cool completely, then place them in an airtight container with parchment paper between the layers. Store in a cool, dry place for 2 to 3 days.
- Freezer: Freeze the ladyfingers on a parchment-lined baking sheet, then place them in an airtight container or freezer bag and freeze for up to 2 months. Thaw at room temperature before serving.

More Vegan Treats and Sweets
Enjoy friends! If you make this vegan ladyfinger recipe, please snap a photo and tag #jessicainthekitchen on Instagram! We’d also love it if you would leave a comment below, and give the recipe a rating! Thanks so much!
Vegan Ladyfingers
Ingredients
- 2 cups all-purpose flour, (240g)
- ¼ cup cornstarch, (32g)
- ½ teaspoon sea salt, 3g
- 2 teaspoons baking powder, 9g
- ½ cup aquafaba, (120g) the liquid from a can of unsalted chickpeas
- ¼ teaspoon cream of tartar, 0.75g
- 1 cup powdered sugar, (120g)
- 1 ½ teaspoons vanilla extract, 7g
- ¼ cup vegan butter, melted and fully cooled – 56g
Instructions
- Preheat the oven to 350°F/180°C, and line two baking sheets with parchment paper. If you have only one baking sheet, that's also fine, you can reuse the same one once the first set of lady fingers is done.
- In a medium bowl, sift together the flour, cornstarch, salt, and baking powder. Stir to combine and set aside.
- Pour the aquafaba and the cream of tartar in the bowl of a very clean and wiped dry stand mixer and whip on high speed with the wire whip attachment until stiff peaks are formed. Start on medium for a few seconds, then move up to high speed. This should take about 2-3 minutes to get stiff peaks.
- Reduce the stand mixer speed to low, and slowly add the powdered sugar. When all the powdered sugar is added in, turn the speed back to high, and whip until the mixture is shiny. It may not be completely stiff but in nice ribbons.
- Reduce the mixer to low and slowly add the vanilla and butter, mixing until well combined. Increase speed back to high for about a minute until everything is combined, then turn off the stand mixer.
- Remove the bowl from the stand mixer and add the sifted flour mixture in three additions, folding gently with a rubber spatula until just combined and no flour pockets remain, being careful not to deflate the aquafaba.
- Transfer the batter to a zip-top bag with a corner cut off or a piping bag with a large round tip (I cut a wide corner to get that inch out). Pipe the mixture into thick lines about 3 inches long and an inch wide on the prepared baking sheets, leaving at least an inch between each cookie.
- Bake for 15 minutes, until the edges are golden and the cookies are set in the center. Remove from the oven and cool for 5 minutes on the baking sheets, then transfer to a wire rack to cool completely.
Notes
- Room temperature: Let the ladyfingers cool completely, then place them in an airtight container with parchment paper between the layers. Store in a cool, dry place for 2 to 3 days.
- Freezer: Freeze the ladyfingers on a parchment-lined baking sheet, then place them in an airtight container or freezer bag and freeze for up to 2 months. Thaw at room temperature before serving.
Disclaimer: Although jessicainthekitchen.com attempts to provide accurate nutritional information, kindly note that these are only estimates. Nutritional information may be affected based on the product type, the brand that was purchased, and in other unforeseeable ways. Jessicainthekitchen.com will not be held liable for any loss or damage resulting for your reliance on nutritional information. If you need to follow a specific caloric regimen, please consult your doctor first.


hi! step #3 says to mix cream of tartar in with aquafaba but it’s not one of the ingredients. can you please clarify?
Hi Tamara!
Cream of tartar is listed right after aquafaba – I hope this helps!! Enjoy so much!