Homemade Sandwich Bread
PB&Js anyone? This easy vegan sandwich bread recipe is a home baker’s dream. Soft and pillowy with a subtle richness, it’s a major upgrade to any sandwich or avocado toast. You’ll see!

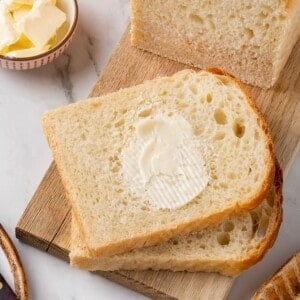
This homemade sandwich bread is just as good as (if not better than) the loaf you’ve been buying at the store. The recipe yields wonderfully tender, fluffy vegan bread every time. The vegan butter and plant milk give it a richness I am obsessed with, and I love the hands-on-ness of the process. From activating the yeast to kneading the dough to watching it rise and bake into perfect loaves, it’s so satisfying.
It’s ideal for sandwiches and/or your favourite Avocado Toast. I’ll sometimes whip up some homemade peanut butter and slather it on there. Yum!
Why It’s Worth Making Sandwich Bread From Scratch
If you’re wondering whether or not you should make the shift from store-bought to homemade sandwich bread? Here’s why you 100% should try:
- It can be tough to get vegan bread right. Without butter and/or milk solids, it often turns out less tender and less flavourful. This recipe uses vegan butter and some soy milk to tackle this issue. The result? A perfectly tender crumb and a subtle richness that’ll keep you coming back for more.
- With its common pantry ingredients and simple instructions, this recipe makes bread-making so approachable.
- By making the bread at home, you have full control over the quality of your ingredients. No funky additives or shelf stabilizers here.

Notes on Ingredients
This homemade bread recipe uses simple ingredients, many of which you likely have in your pantry. Here’s what you’ll need (see the recipe card below for exact measurements):
- Warm water – You want it at 100-110°F. If it’s too cold, it won’t activate the yeast. If it’s too hot, it’ll kill the yeast. So you really want to find that sweet spot.
- Granulated sugar – You could use honey instead. Don’t try to use less sugar. You need it here to feed the yeast.
- Active dry yeast – Make sure it’s fresh. Check out my post on How to Test Yeast to see how it’s done.
- Unsweetened plant-based milk – Soy milk, cashew milk, rice milk. They all work well. The addition of plant milk (especially soy milk) makes this bread a bit richer than it would be with just water.
- Vegan butter – You’ll use some softened butter in the dough to help make it richer. Then you’ll want a little melted butter for brushing over the finished loaves. Want to make your own? Check out my Homemade Vegan Butter Recipe.
- Bread flour – If you can’t find bread flour, you can make your own. For every cup of all-purpose flour (125g), replace 1½ teaspoons (4g) with vital wheat gluten.
- Fine sea salt – Table salt will also work.
- Oil – To grease the bowls and pans. I like olive oil here, but feel free to use your favourite.
Is Yeast Vegan?
Yes! This common pantry ingredient is, thankfully, vegan. It’s a type of fungus, so it’s as vegan as any plant or mushroom. Learn about all things yeast in my post, Yeast: Is it Vegan, and Other Questions.
How to Make Sandwich Bread
Here comes a quick look at how to make this fluffy sandwich bread. For more detailed instructions, see the recipe card below:


- Activate the yeast. Stir the sugar into the warm water until it’s mostly dissolved. Sprinkle in the yeast and let it sit for 5-10 minutes until foamy and puffed.
- Add the milk and butter. Stir in the plant-based milk and softened vegan butter.


- Add the flour and salt. Mix in half of the flour. Add the salt and gradually stir in the remaining flour. When the dough becomes too hard to stir, transfer it to a lightly floured surface.
- Knead. Knead the dough for 8-10 minutes, until smooth, elastic, and soft.


- First rise. Place the dough in a clean, oiled bowl, turning it once to coat in oil. Cover with a clean towel and let it rise in a warm place for 60-90 minutes, or until doubled in size.


- Divide the dough. Gently punch down the dough and divide it into 2 equal pieces. Flatten each into a rectangle roughly the width of your loaf pan.


- Shape the loaves. Roll into a log. Pinch the seam closed and tuck the ends under the loaf.


- Second rise. Place each loaf seam-side down in a lightly greased 8×4-inch loaf pan. Cover loosely and let the dough rise for 30-45 minutes.
- Preheat. Preheat the oven to 375°F (190°C).


- Bake. Bake for 30-35 minutes.
- Finish. Remove the loaves from the oven and brush the tops with melted vegan butter if you’d like.
- Cool. Cool in the pans for 10 minutes, then transfer to a wire rack. Cool completely before slicing.
Food Processor Alternative
If you’d like to make the dough in a food processor, you can. Activate the yeast, mix in the milk and butter, and transfer the mixture to a food processor fitted with a dough hook. Pulse a few times until a rough dough forms, then knead on medium speed for 5 minutes. The dough should be smooth, soft, and just starting to pull away from the sides. The rest is business as usual.

Tips for the Perfect Loaf
Bread-making can be a little intimidating, but with the right recipe and some simple tips and tricks, anyone can do it:
- Make sure the yeast is alive. If the mixture does not foam, your yeast might not be good anymore. Start again with fresh yeast (see my post on How to Test Yeast).
- Get the water right. The water should be 100-110°F. If it’s too warm, it will kill the yeast. If it’s too cool, it won’t activate the yeast properly.
- Don’t overwork the dough. Overworking the dough will cause the glutens in the flour to overdevelop. This will yield a tough, over-dense loaf. Knead just until the dough is smooth and elastic. No more.
- Adjust for moisture. Feel free to add a little extra flour or water to the dough to get the texture right. If it’s too dry, add water 1 tablespoon (15ml) at a time. Too sticky? Add flour 1 tablespoon (8g) at a time.
- Easy on the flour. You’ll need to lightly flour your hands and your work surface, but be careful not to add too much flour. This can make the bread dense.
- Use the proper tools. Consider a bench scraper to help you handle and shape the dough.
- Don’t over (or under) bake. Bake the loaves just until they are golden brown on top and sound hollow when tapped on top. The sides should look set and lightly browned.
- Prevent burning. If the tops of the loaves start to brown too quickly, you can loosely tent them with foil toward the end of the baking process.
- Butter hack. If you want a softer crust (great for sandwich bread), brush the warm loaves with melted vegan butter.
- Cool completely. Let the loaves cool completely before slicing. Otherwise, the crumb won’t set properly.

Flavour Variations
Want to mix things up a bit? Feel free to add your own spin to this recipe. Here are a few fun ways to doll it up:
- Honey-oat bread. Sometimes I’ll replace the sugar with honey and add ½ cup rolled oats (40g) to the dough. It’s a lovely spin on the original.
- Cinnamon swirl. Prefer something a little sweeter? Mix together some cinnamon and sugar. After you roll the dough into rectangles, sprinkle each with the cinnamon sugar, then roll into loaves.
- Rosemary olive oil. Add some chopped fresh rosemary to the dough and swap the butter oil for a quality olive oil.
How to Store Homemade Bread
- Countertop. Once the bread has cooled completely, wrap it in a double layer of plastic wrap or seal it in an airtight container. It’ll keep at room temperature for up to 5 days.
- Freezer. Wrap each fully cooled loaf in a double layer of plastic wrap. Store them in the freezer for up to 3 months. When you’re ready to enjoy, allow the bread to thaw at room temperature.
Do not store this bread in the fridge. It will dry out.

More Vegan Bread Recipes
Feeling inspired to make more bread? You’ve got to try some of my other recipes:
- Classic French Bread Recipe
- Vegan Japanese Milk Bread
- Beer Bread Recipe
- No Knead Bread
- Pumpernickel Bread
- Dutch Oven Sourdough Bread
Enjoy friends! If you make this vegan sandwich bread, please snap a photo and tag #jessicainthekitchen on Instagram! We’d also love it if you would leave a comment below, and give the recipe a rating! Thanks so much!
Homemade Sandwich Bread
Ingredients
- 1 ½ cups warm water, about 100-110°F, 350ml
- ¼ cup + 1 tablespoon granulated sugar, 60g
- 1 ½ tablespoons active dry yeast, 14g
- ¾ cup unsweetened plant-based milk, 180ml
- 7 tablespoons vegan butter, softened, 100g
- 6 3/4 cups bread flour, 840g
- 2 ½ teaspoons fine sea salt, 15g
- 1-2 teaspoons oil, for the bowl and pans, roughly 10ml
- 1 tablespoon melted vegan butter, for brushing, 14g
Instructions
- Activate the yeast. In a large mixing bowl, combine the warm water and sugar. Stir until the sugar is mostly dissolved. Sprinkle the yeast over the top and let it sit for 5-10 minutes, until the surface looks foamy and puffed. If the mixture does not foam, the yeast may be inactive or the water may have been too hot or too cool, so it is best to start again before adding the other ingredients.
- Add the milk and butter. Pour in the plant-based milk and add the softened vegan butter. Stir to combine. The butter does not need to fully dissolve at this stage, but it should be soft enough to mix into the dough easily.
- Add the flour and salt. Add about half of the flour and mix until you have a thick batter-like mixture. Add the salt, then gradually add the remaining flour, mixing after each addition, until a soft dough forms. Once the dough becomes too hard to stir, use your hands or transfer it to a lightly floured surface.
- Knead the dough. Knead the dough for 8-10 minutes, until it becomes smooth, elastic, and soft. It should feel slightly tacky but should not stick heavily to your hands or the counter. If the dough feels very dry, add 1 tablespoon (15ml) of water at a time. If it feels too sticky, sprinkle in a little extra flour, just 1 tablespoon (8g) at a time.
- First rise. Lightly oil a clean bowl. Place the dough in the bowl, turning it once so the top is lightly coated. Cover with a clean towel or plastic wrap and let it rise in a warm place for 60-90 minutes, or until doubled in size.
- Shape the loaves. Grease two 8×4 inch loaf pans lightly with oil or vegan butter. Punch down the risen dough gently to release excess air. Divide it into 2 equal pieces. Working with one piece at a time, flatten the dough into a rectangle about the width of your loaf pan. Roll it up tightly from the short end into a log, like a jelly roll. Pinch the seam closed and tuck the ends slightly underneath if needed. Place it seam-side down into the prepared pan. Repeat with the second piece.
- Second rise. Cover the pans loosely and let the dough rise again for 30-45 minutes, until the tops of the dough rise about 1 inch (2.5cm) above the rim of the pans. While the bread is rising, preheat the oven to 375°F (190°C).
- Bake. Bake for 30-35 minutes, until the loaves are golden brown on top. The bread should sound hollow when tapped on top, and the sides should look set and lightly browned. If the tops are browning too quickly, loosely tent them with foil for the last 10 minutes of baking.
- Finish and cool. Remove the loaves from the oven. If you want a softer crust, brush the tops with a little melted vegan butter while the bread is still hot. Let the loaves cool in the pans for 10 minutes, then carefully remove them and place them on a wire rack. Cool completely before slicing so the crumb can set properly.
Notes
- Make sure the yeast is alive. For the bread to rise properly, it’s very important your yeast is alive and active! See my post on How to Test Yeast.
- Water temp. If the water is too warm, it will kill the yeast. Too cold and the yeast won’t activate properly. Make sure it’s 100-110°F.
- Don’t overwork the dough. This will cause the glutens in the flour to overdevelop, resulting in tough, over-dense loaves.
- Easy on the flour. As you knead the dough, be careful not to add too much flour. This can make the bread dense.
- Storage. Once fully cool, seal the bread in an airtight container (or wrap it in a double layer of plastic wrap). It’ll keep at room-temperature for 5 days or in the freezer for up to 3 months.
Disclaimer: Although jessicainthekitchen.com attempts to provide accurate nutritional information, kindly note that these are only estimates. Nutritional information may be affected based on the product type, the brand that was purchased, and in other unforeseeable ways. Jessicainthekitchen.com will not be held liable for any loss or damage resulting for your reliance on nutritional information. If you need to follow a specific caloric regimen, please consult your doctor first.


