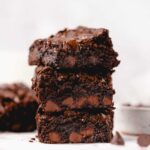
Gluten Free Brownies (Vegan)
These gluten free brownies are thick, moist, chewy and taste incredible! They only need 10 ingredients, and are perfect for your gluten free and allergy friendly needs! Follow my tips for the best results every time!
Ingredients
- 1 cup chocolate chips melted (188g)
- 1 cup Bob’s Red Mill Gluten Free 1-to-1 Baking Flour (133.75g)
- 1/2 teaspoon sea salt
- 1/4 teaspoon baking soda
- 2 Bob’s Red Mill Egg Replacer* or flax eggs (see notes below)
- 3/4 cup brown sugar or cane sugar or coconut sugar (158g)
- 1/3 cup melted coconut oil or any oil (66g)
- ¼ cup water
- 1 teaspoon pure vanilla extract
- 1 cup chocolate chips unmelted
Instructions
- Preheat the oven to 325°F/160°C.
- Melt chocolate chips in the microwave for a minute, stirring after to see if chips have melted. If not, microwave in increments of 30 seconds until completely melted. Alternatively, you can melt it over a small pot of boiling water (Not a lot of water in the pot) and put the chocolate chips in a heatproof and melt proof bowl over the pot and stir until melted.
- In a medium bowl, whisk the flour, salt and baking soda until combined. Set aside.
- In a separate bowl, add the egg replacers, sugar and oil and mix until combined for about 2 minutes. Add the water and the vanilla extract and mix.
- Add the dry mixture from earlier to the wet mixture along with the melted chocolate chips and stir for about 3 minutes until combined.
- Stir in 1 cup chocolate chips. Pour into a parchment paper lined 8×8 square pan. Bake for 35 minutes.
- When finished, remove from the oven and allow to cool completely in a pan on a wire rack.
- Slice into 9, 12 or 16 slices. Enjoy!
Notes
Tips for Success:
- Pan Size: Don’t change the pan size! It’s crucial for the success of the right texture and outcome of brownies.
- Especially for gluten free flour, I always recommended weighing out your flour. If you look on the back of the flour, it actually weights differently than wheat flour, and that’s why it’s extra important to weigh it out. I just use a regular kitchen scale, and get guaranteed results each time. Plus, weighing out my ingredients removes ANY stress from the baking process as to whether you’re “doing it correctly”.
- For Extra Fudgy Brownies: once the brownies have cooled, let them firm up in the fridge for an hour or two. If you’re a fan of really thick, dense brownies (i.e. not cake-like), this is the way to go.
- Also, let the brownies cool before you cut them so that they don’t crumble.
- For the best texture, the egg replacers are my go to. Flax eggs are also a great option, but as there is natural oil in flax seeds, it can produce a slightly “oily on the bottom” results. This doesn’t happen when you’re using the egg replacers. One bag lasts a while, and I just always keep one in the fridge for whenever I’m ready to use it.
- Especially if you’re using an older baking pan, I recommend using parchment paper to line your pan. It makes sticking basically impossible, and allows you to lift the entire brownie out of the pan!
- Now, your chocolate chips. The chocolate chips you use in this recipe can actually make a huge difference on whether your brownies come out cake-y or fudgy! I highly recommend using a semi-sweet or vegan milk chocolate here. It tends to have more cocoa butter/chocolate liquor base, which results in a creamier and fudgier consistency.
- Especially ensure that you weigh out your oil. I can’t tell you how many times I eye-ball oil and it’s way over the actual weight, which can produce an over-oily end product.
- Always check that your baking soda is still fresh before starting!
Nutrition
Calories: 217kcal | Carbohydrates: 29g | Protein: 2g | Fat: 12g | Saturated Fat: 8g | Sodium: 93mg | Potassium: 14mg | Fiber: 2g | Sugar: 21g | Calcium: 43mg | Iron: 2mg